Software de Confianza

Outbyte Driver Updater
- 1,000,000+ controladores
- Descargado: 1,143,473 veces
- Windows 11 / 10 / 8 / 7





 Descargar
GM107 GeForce GTX 750 Ti
Descargar
GM107 GeForce GTX 750 Ti
Descargar
GM107 GeForce GTX 750 Ti

Información del Sistema
Su PC está funcionando con:
Driver details
Driver Name:
GM107 GeForce GTX 750 Ti
Provider:
NVIDIA
Version:
32.0.15.6094
Release Date:
8/14/2024
Architecture:
AMD64
File Size:
800.9 MB
Driver ID:
pci\ven_10de&dev_1380
Supported OS:
Windows 10
WHQL:
Signed
Oferta especial
Descargar
Todos los enlaces han sido escaneados por un programa antivirus.
Manual download (.cab, 800.9 MB) from Microsoft servers
— install via Device Manager.
Compatible hardware
- GM107 [GeForce GTX 750 Ti] (NVIDIA Corporation)
- GM107 [GeForce GTX 750] (NVIDIA Corporation)
- GM107 [GeForce GTX 745] (NVIDIA Corporation)
- GM107M [GeForce GTX 750 Ti] (NVIDIA Corporation)
- GM204 [GeForce GTX 980] (NVIDIA Corporation)
- GM204 [GeForce GTX 970] (NVIDIA Corporation)
- GM206 [GeForce GTX 960] (NVIDIA Corporation)
- GM206 [GeForce GTX 950] (NVIDIA Corporation)
- GM206 [GeForce GTX 960 OEM] (NVIDIA Corporation)
- GM206 [GeForce GTX 750 v2] (NVIDIA Corporation)
- GM200 [GeForce GTX TITAN X] (NVIDIA Corporation)
- GM200 [GeForce GTX 980 Ti] (NVIDIA Corporation)
- GP102 [TITAN X Pascal] (NVIDIA Corporation)
- GP102 [TITAN Xp] (NVIDIA Corporation)
- GP102 [GeForce GTX 1080 Ti] (NVIDIA Corporation)
- GP104 [GeForce GTX 1080] (NVIDIA Corporation)
- GP104 [GeForce GTX 1070] (NVIDIA Corporation)
- GP104 [GeForce GTX 1070 Ti] (NVIDIA Corporation)
- GP104 [GeForce GTX 1060 6GB] (NVIDIA Corporation)
- GP104 [GeForce GTX 1060 3GB] (NVIDIA Corporation)
- GP106 [GeForce GTX 1060 3GB] (NVIDIA Corporation)
- GP106 [GeForce GTX 1060 6GB] (NVIDIA Corporation)
- GP106 [GeForce GTX 1060 5GB] (NVIDIA Corporation)
- GP106 [GeForce GTX 1060 6GB Rev. 2] (NVIDIA Corporation)
- GP107 [GeForce GTX 1050] (NVIDIA Corporation)
- GP107 [GeForce GTX 1050 Ti] (NVIDIA Corporation)
- GP107 [GeForce GTX 1050 3GB] (NVIDIA Corporation)
- GP108 [GeForce GT 1030] (NVIDIA Corporation)
- GP108 [GeForce GT 1010] (NVIDIA Corporation)
- GV100 [TITAN V] (NVIDIA Corporation)
- GV100GL [Quadro GV100] (NVIDIA Corporation)
- TU102 [TITAN RTX] (NVIDIA Corporation)
- TU102 [GeForce RTX 2080 Ti] (NVIDIA Corporation)
- TU102 [GeForce RTX 2080 Ti Rev. A] (NVIDIA Corporation)
- TU104 [GeForce RTX 2080 SUPER] (NVIDIA Corporation)
- TU104 [GeForce RTX 2080] (NVIDIA Corporation)
- TU104 [GeForce RTX 2070 SUPER] (NVIDIA Corporation)
- TU104 [GeForce RTX 2080 Rev. A] (NVIDIA Corporation)
- TU104 [GeForce RTX 2060] (NVIDIA Corporation)
- TU106 [GeForce RTX 2070] (NVIDIA Corporation)
- TU106 [GeForce RTX 2060 12GB] (NVIDIA Corporation)
- TU106 [GeForce RTX 2060 SUPER] (NVIDIA Corporation)
- TU106 [GeForce RTX 2070 Rev. A] (NVIDIA Corporation)
- TU106 [GeForce RTX 2060 Rev. A] (NVIDIA Corporation)
- TU106 [GeForce GTX 1650] (NVIDIA Corporation)
- TU117 [GeForce GTX 1650] (NVIDIA Corporation)
- TU117 [GeForce GTX 1630] (NVIDIA Corporation)
- TU116 [GeForce GTX 1660 Ti] (NVIDIA Corporation)
- TU116 [GeForce GTX 1660] (NVIDIA Corporation)
- TU116 [GeForce GTX 1650 SUPER] (NVIDIA Corporation)
- TU116 [GeForce GTX 1650] (NVIDIA Corporation)
- TU116 [GeForce GTX 1660 SUPER] (NVIDIA Corporation)
- GA102 [GeForce RTX 3090 Ti] (NVIDIA Corporation)
- GA102 [GeForce RTX 3090] (NVIDIA Corporation)
- GA102 [GeForce RTX 3080] (NVIDIA Corporation)
- GA102 [GeForce RTX 3070 Ti] (NVIDIA Corporation)
- GA102 [GeForce RTX 3080 Ti] (NVIDIA Corporation)
- GA102 [GeForce RTX 3080 12GB] (NVIDIA Corporation)
- GA102 [GeForce RTX 3080 Lite Hash Rate] (NVIDIA Corporation)
- GA103 [GeForce RTX 3060 Ti] (NVIDIA Corporation)
- GA104 [GeForce RTX 3070 Ti] (NVIDIA Corporation)
- GA104 [GeForce RTX 3070] (NVIDIA Corporation)
- GA104 [GeForce RTX 3060 Ti] (NVIDIA Corporation)
- GA104 [GeForce RTX 3060] (NVIDIA Corporation)
- GA104 [GeForce RTX 3070 Lite Hash Rate] (NVIDIA Corporation)
- GA104 [GeForce RTX 3060 Ti Lite Hash Rate] (NVIDIA Corporation)
- GA104 [GeForce RTX 3060 8GB] (NVIDIA Corporation)
- GA104 [GeForce RTX 3060 Ti GDDR6X] (NVIDIA Corporation)
- GA106 [GeForce RTX 3060] (NVIDIA Corporation)
- GA106 [GeForce RTX 3060 Lite Hash Rate] (NVIDIA Corporation)
- GA106 [Geforce RTX 3050] (NVIDIA Corporation)
- GA106 [GeForce RTX 3050 OEM] (NVIDIA Corporation)
- GA107 [GeForce RTX 3050 8GB] (NVIDIA Corporation)
- GA107 [GeForce RTX 3050 6GB] (NVIDIA Corporation)
- AD102 [GeForce RTX 4090] (NVIDIA Corporation)
- AD102 [GeForce RTX 4090 D] (NVIDIA Corporation)
- AD102 [GeForce RTX 4070 Ti SUPER] (NVIDIA Corporation)
- AD103 [GeForce RTX 4080 SUPER] (NVIDIA Corporation)
- AD103 [GeForce RTX 4080] (NVIDIA Corporation)
- AD103 [GeForce RTX 4070 Ti SUPER] (NVIDIA Corporation)
- AD103 [GeForce RTX 4070] (NVIDIA Corporation)
- AD104 [GeForce RTX 4070 Ti] (NVIDIA Corporation)
- AD104 [GeForce RTX 4070 SUPER] (NVIDIA Corporation)
- AD104 [GeForce RTX 4070] (NVIDIA Corporation)
- AD104 [GeForce RTX 4060 Ti] (NVIDIA Corporation)
- AD106 [GeForce RTX 4060 Ti] (NVIDIA Corporation)
- AD106 [GeForce RTX 4060 Ti 16GB] (NVIDIA Corporation)
- AD106 [GeForce RTX 4060] (NVIDIA Corporation)
- AD107 [GeForce RTX 4060] (NVIDIA Corporation)
Supported Hardware IDs
pci\ven_10de&dev_1380
pci\ven_10de&dev_1381
pci\ven_10de&dev_1382
pci\ven_10de&dev_139d
pci\ven_10de&dev_13b9
pci\ven_10de&dev_13ba
pci\ven_10de&dev_13bb
pci\ven_10de&dev_13bc
pci\ven_10de&dev_13c0
pci\ven_10de&dev_13c2
Show all 241 hardware IDs
pci\ven_10de&dev_13f0
pci\ven_10de&dev_13f1
pci\ven_10de&dev_1401
pci\ven_10de&dev_1402
pci\ven_10de&dev_1406
pci\ven_10de&dev_1407
pci\ven_10de&dev_1430
pci\ven_10de&dev_15f0
pci\ven_10de&dev_17c2
pci\ven_10de&dev_17c8
pci\ven_10de&dev_17f0
pci\ven_10de&dev_17f1
pci\ven_10de&dev_1b00
pci\ven_10de&dev_1b02
pci\ven_10de&dev_1b02&subsys_123e10de
pci\ven_10de&dev_1b02&subsys_123f10de
pci\ven_10de&dev_1b06
pci\ven_10de&dev_1b30
pci\ven_10de&dev_1b80
pci\ven_10de&dev_1b81
pci\ven_10de&dev_1b82
pci\ven_10de&dev_1b83
pci\ven_10de&dev_1b84
pci\ven_10de&dev_1b87
pci\ven_10de&dev_1bb0
pci\ven_10de&dev_1bb1
pci\ven_10de&dev_1bb6&subsys_11b410de
pci\ven_10de&dev_1bb8&subsys_11b410de
pci\ven_10de&dev_1bb8&subsys_11b610de
pci\ven_10de&dev_1bc7
pci\ven_10de&dev_1c02
pci\ven_10de&dev_1c03
pci\ven_10de&dev_1c04
pci\ven_10de&dev_1c06
pci\ven_10de&dev_1c07
pci\ven_10de&dev_1c09
pci\ven_10de&dev_1c30
pci\ven_10de&dev_1c31
pci\ven_10de&dev_1c81
pci\ven_10de&dev_1c82
pci\ven_10de&dev_1c83
pci\ven_10de&dev_1cb1
pci\ven_10de&dev_1cb2
pci\ven_10de&dev_1cb3
pci\ven_10de&dev_1cb6
pci\ven_10de&dev_1d01
pci\ven_10de&dev_1d02
pci\ven_10de&dev_1d81
pci\ven_10de&dev_1dba
pci\ven_10de&dev_1dba&subsys_12eb10de
pci\ven_10de&dev_1e02
pci\ven_10de&dev_1e04
pci\ven_10de&dev_1e07
pci\ven_10de&dev_1e07&subsys_143510de
pci\ven_10de&dev_1e09
pci\ven_10de&dev_1e30
pci\ven_10de&dev_1e30&subsys_129e1028
pci\ven_10de&dev_1e30&subsys_129e103c
pci\ven_10de&dev_1e30&subsys_129e10de
pci\ven_10de&dev_1e30&subsys_12ba1028
pci\ven_10de&dev_1e30&subsys_12ba103c
pci\ven_10de&dev_1e30&subsys_12ba10de
pci\ven_10de&dev_1e78&subsys_13d810de
pci\ven_10de&dev_1e78&subsys_13d910de
pci\ven_10de&dev_1e81
pci\ven_10de&dev_1e82
pci\ven_10de&dev_1e84
pci\ven_10de&dev_1e87
pci\ven_10de&dev_1e89
pci\ven_10de&dev_1eb0
pci\ven_10de&dev_1eb1
pci\ven_10de&dev_1eb8&subsys_12a210de
pci\ven_10de&dev_1ec2
pci\ven_10de&dev_1ec7
pci\ven_10de&dev_1f02
pci\ven_10de&dev_1f03
pci\ven_10de&dev_1f06
pci\ven_10de&dev_1f07
pci\ven_10de&dev_1f08
pci\ven_10de&dev_1f0a
pci\ven_10de&dev_1f0b
pci\ven_10de&dev_1f36&subsys_10501028
pci\ven_10de&dev_1f42
pci\ven_10de&dev_1f47
pci\ven_10de&dev_1f82
pci\ven_10de&dev_1f83
pci\ven_10de&dev_1fb0&subsys_12db1028
pci\ven_10de&dev_1fb0&subsys_12db10de
pci\ven_10de&dev_1fb0&subsys_148510de
pci\ven_10de&dev_1fb1&subsys_14881028
pci\ven_10de&dev_1fb1&subsys_148810de
pci\ven_10de&dev_1fb2&subsys_14891028
pci\ven_10de&dev_1fb2&subsys_148910de
pci\ven_10de&dev_1ff0&subsys_16121028
pci\ven_10de&dev_1ff0&subsys_161210de
pci\ven_10de&dev_1ff2&subsys_16131028
pci\ven_10de&dev_1ff2&subsys_161310de
pci\ven_10de&dev_1ff2&subsys_18ff10de
pci\ven_10de&dev_20b0&subsys_134f10de
pci\ven_10de&dev_20b0&subsys_144e10de
pci\ven_10de&dev_20b0&subsys_145010de
pci\ven_10de&dev_20b2&subsys_146310de
pci\ven_10de&dev_20b2&subsys_147f10de
pci\ven_10de&dev_20b2&subsys_162210de
pci\ven_10de&dev_20b2&subsys_162310de
pci\ven_10de&dev_20b2&subsys_162510de
pci\ven_10de&dev_20b3&subsys_14a710de
pci\ven_10de&dev_20b3&subsys_14a810de
pci\ven_10de&dev_20b5&subsys_153310de
pci\ven_10de&dev_20b5&subsys_164210de
pci\ven_10de&dev_20b6&subsys_149210de
pci\ven_10de&dev_20b7&subsys_153210de
pci\ven_10de&dev_20b7&subsys_180410de
pci\ven_10de&dev_20b7&subsys_185210de
pci\ven_10de&dev_20bd&subsys_17f410de
pci\ven_10de&dev_20f1&subsys_145f10de
pci\ven_10de&dev_20f3&subsys_179b10de
pci\ven_10de&dev_20f3&subsys_179c10de
pci\ven_10de&dev_20f3&subsys_179d10de
pci\ven_10de&dev_20f3&subsys_179e10de
pci\ven_10de&dev_20f3&subsys_179f10de
pci\ven_10de&dev_20f3&subsys_17a010de
pci\ven_10de&dev_20f3&subsys_17a110de
pci\ven_10de&dev_20f3&subsys_17a210de
pci\ven_10de&dev_20f5&subsys_179910de
pci\ven_10de&dev_20f5&subsys_179a10de
pci\ven_10de&dev_20f6&subsys_180a1028
pci\ven_10de&dev_20f6&subsys_180a10de
pci\ven_10de&dev_20fd&subsys_17f810de
pci\ven_10de&dev_2182
pci\ven_10de&dev_2184
pci\ven_10de&dev_2187
pci\ven_10de&dev_2188
pci\ven_10de&dev_2189
pci\ven_10de&dev_21c4
pci\ven_10de&dev_2203
pci\ven_10de&dev_2204
pci\ven_10de&dev_2206
pci\ven_10de&dev_2207
pci\ven_10de&dev_2208
pci\ven_10de&dev_220a
pci\ven_10de&dev_220d
pci\ven_10de&dev_2216
pci\ven_10de&dev_2230&subsys_14591028
pci\ven_10de&dev_2230&subsys_145910de
pci\ven_10de&dev_2231&subsys_147e1028
pci\ven_10de&dev_2231&subsys_147e10de
pci\ven_10de&dev_2232&subsys_163c1028
pci\ven_10de&dev_2232&subsys_163c10de
pci\ven_10de&dev_2233&subsys_165a1028
pci\ven_10de&dev_2233&subsys_165a10de
pci\ven_10de&dev_2235&subsys_145a10de
pci\ven_10de&dev_2236&subsys_148210de
pci\ven_10de&dev_2237&subsys_152f10de
pci\ven_10de&dev_2238&subsys_167710de
pci\ven_10de&dev_2321&subsys_183910de
pci\ven_10de&dev_2322&subsys_17a410de
pci\ven_10de&dev_2324&subsys_17a610de
pci\ven_10de&dev_2324&subsys_17a810de
pci\ven_10de&dev_2329&subsys_198b10de
pci\ven_10de&dev_2329&subsys_198c10de
pci\ven_10de&dev_2330&subsys_16c010de
pci\ven_10de&dev_2330&subsys_16c110de
pci\ven_10de&dev_2331&subsys_162610de
pci\ven_10de&dev_2339&subsys_17fc10de
pci\ven_10de&dev_233a&subsys_183a10de
pci\ven_10de&dev_2414
pci\ven_10de&dev_2482
pci\ven_10de&dev_2484
pci\ven_10de&dev_2486
pci\ven_10de&dev_2487
pci\ven_10de&dev_2488
pci\ven_10de&dev_2489
pci\ven_10de&dev_248a
pci\ven_10de&dev_24b0&subsys_14ad1028
pci\ven_10de&dev_24b0&subsys_14ad10de
pci\ven_10de&dev_24b1&subsys_165810de
pci\ven_10de&dev_24c7
pci\ven_10de&dev_24c9
pci\ven_10de&dev_2503
pci\ven_10de&dev_2504
pci\ven_10de&dev_2507
pci\ven_10de&dev_2508
pci\ven_10de&dev_2531&subsys_151d1028
pci\ven_10de&dev_2531&subsys_151d10de
pci\ven_10de&dev_2544
pci\ven_10de&dev_2571&subsys_16111028
pci\ven_10de&dev_2571&subsys_161110de
pci\ven_10de&dev_2582
pci\ven_10de&dev_2584
pci\ven_10de&dev_25b0&subsys_187810de
pci\ven_10de&dev_25b2&subsys_187910de
pci\ven_10de&dev_25b6&subsys_14a910de
pci\ven_10de&dev_25b6&subsys_157e10de
pci\ven_10de&dev_2684
pci\ven_10de&dev_2685
pci\ven_10de&dev_2689
pci\ven_10de&dev_26b1&subsys_16a11028
pci\ven_10de&dev_26b1&subsys_16a110de
pci\ven_10de&dev_26b2&subsys_17fa1028
pci\ven_10de&dev_26b2&subsys_17fa10de
pci\ven_10de&dev_26b3&subsys_193410de
pci\ven_10de&dev_26b5&subsys_169d10de
pci\ven_10de&dev_26b5&subsys_17da10de
pci\ven_10de&dev_26b9&subsys_185110de
pci\ven_10de&dev_26b9&subsys_18cf10de
pci\ven_10de&dev_26ba&subsys_195710de
pci\ven_10de&dev_26ba&subsys_199010de
pci\ven_10de&dev_2702
pci\ven_10de&dev_2704
pci\ven_10de&dev_2705
pci\ven_10de&dev_2709
pci\ven_10de&dev_2782
pci\ven_10de&dev_2783
pci\ven_10de&dev_2786
pci\ven_10de&dev_2788
pci\ven_10de&dev_27b0&subsys_16fa1028
pci\ven_10de&dev_27b0&subsys_16fa10de
pci\ven_10de&dev_27b1&subsys_180c1028
pci\ven_10de&dev_27b1&subsys_180c10de
pci\ven_10de&dev_27b2&subsys_181b1028
pci\ven_10de&dev_27b2&subsys_181b10de
pci\ven_10de&dev_27b6&subsys_193310de
pci\ven_10de&dev_27b8&subsys_16ca10de
pci\ven_10de&dev_27b8&subsys_16ee10de
pci\ven_10de&dev_2803
pci\ven_10de&dev_2805
pci\ven_10de&dev_2808
pci\ven_10de&dev_2882
pci\ven_10de&dev_28b0&subsys_187010de
pci\ven_10de&dev_28b0&subsys_187110de
Match against Device Manager → Details → Hardware Ids to confirm this driver fits your device.
File details
File name:
c5af1413-f4d6-4498-8b06-6f0eb0d3561c_bd02b4d1e80458b11d8dad7b4036c496eb38b180.cab
File size:
839772957 bytes (800.8 MB)
Signed / DriverVer:
08/14/2024, 32.0.15.6094
Provider (INF):
NVIDIA
Catalog file:
NV_DISP.CAT
SHA-256:
8520084274f562078a8b9fc0b15937656d54593dc65f32ee14f499c9cae23b89
To verify: open PowerShell and run Get-FileHash <filename.cab>
What's inside the package (335 files)
0000.ui.forms 61.3 KB
0000.ui.strings 1.3 KB
0401.ui.forms 4.2 KB
0401.ui.strings 11.5 KB
0404.ui.forms 4.5 KB
0404.ui.strings 9.6 KB
0405.ui.forms 4.6 KB
0405.ui.strings 10.2 KB
0406.ui.forms 4.4 KB
0406.ui.strings 9.9 KB
0407.ui.forms 6.2 KB
0407.ui.strings 10.8 KB
0408.ui.forms 6.8 KB
0408.ui.strings 14.3 KB
0409.ui.forms 4.3 KB
0409.ui.strings 9.5 KB
040a.ui.forms 5.0 KB
040a.ui.strings 10.2 KB
040b.ui.forms 5.8 KB
040b.ui.strings 10.0 KB
040c.ui.forms 6.7 KB
040c.ui.strings 10.7 KB
040d.ui.forms 4.4 KB
040d.ui.strings 11.6 KB
040e.ui.forms 4.4 KB
040e.ui.strings 10.3 KB
0410.ui.forms 4.5 KB
0410.ui.strings 10.4 KB
0411.ui.forms 4.5 KB
0411.ui.strings 11.6 KB
0412.ui.forms 4.4 KB
0412.ui.strings 10.5 KB
0413.ui.forms 5.7 KB
0413.ui.strings 10.2 KB
0414.ui.forms 4.6 KB
0414.ui.strings 9.8 KB
0415.ui.forms 6.8 KB
0415.ui.strings 10.2 KB
0416.ui.forms 5.4 KB
0416.ui.strings 10.0 KB
0419.ui.forms 5.8 KB
0419.ui.strings 12.9 KB
041b.ui.forms 4.6 KB
041b.ui.strings 10.3 KB
041d.ui.forms 4.6 KB
041d.ui.strings 9.9 KB
041e.ui.forms 5.7 KB
041e.ui.strings 16.4 KB
041f.ui.forms 5.0 KB
041f.ui.strings 10.0 KB
0422.ui.forms 5.4 KB
0422.ui.strings 13.8 KB
0424.ui.forms 5.3 KB
0424.ui.strings 10.0 KB
0804.ui.strings 9.0 KB
0809.ui.strings 9.5 KB
080a.ui.strings 10.2 KB
0816.ui.forms 5.5 KB
0816.ui.strings 10.4 KB
DisplayDriver.nvi 92.0 KB
DisplayDriverExt.dll 1.8 MB
EULA.txt 21.1 KB
HDAudio.nvi 10.2 KB
HDAudioExt.dll 1.0 MB
NVGPUP.Container.exe 1.2 MB
NVI2.dll 6.4 MB
NVI2UI.dll 1.9 MB
NVPCF.nvi 1.1 KB
NVPrxy32.dll 1.1 MB
NVPrxy64.dll 1.4 MB
NvCCX.dll 1.3 MB
NvContainerRecovery.bat 1.9 KB
NvInstallerUtil.dll 4.3 MB
NvTelemetry64.dll 4.2 MB
USBC.nvi 1.2 KB
USBCExt.dll 933.1 KB
UcmCxUcsiNvppc.sys 708.0 KB
_nvngx.dl_ 709.0 KB
box_checked_disabled.png 937 B
box_checked_enabled.png 821 B
box_partialcheckboxed_enabled.png 3.1 KB
box_unchecked_disabled.png 180 B
box_unchecked_enabled.png 701 B
btn_disable_135.png 720 B
btn_disable_180.png 738 B
btn_disable_90.png 705 B
btn_primary_135.png 870 B
btn_primary_180.png 894 B
btn_primary_90.png 852 B
btn_primary_focus_135.png 882 B
btn_primary_focus_180.png 908 B
btn_primary_focus_90.png 863 B
btn_primary_pressed_135.png 842 B
btn_primary_pressed_180.png 867 B
btn_primary_pressed_90.png 822 B
btn_secondary_135.png 815 B
btn_secondary_180.png 833 B
btn_secondary_90.png 796 B
btn_secondary_focus_135.png 801 B
btn_secondary_focus_180.png 824 B
btn_secondary_focus_90.png 789 B
btn_secondary_pressed_135.png 819 B
btn_secondary_pressed_180.png 841 B
btn_secondary_pressed_90.png 803 B
check.png 731 B
checkmark.png 641 B
circled_checkmark.png 2.9 KB
cudnn_infer64_7.dl_ 13.2 MB
dbInstaller.exe 803.1 KB
error.png 2.4 KB
flxconnect64.dl_ 4.7 MB
flxcore64.dl_ 6.1 MB
grid-proxy-credentials.ps1 4.4 KB
grid-third-party-licenses.txt 104.7 KB
gsp_ga10x.bi_ 37.1 MB
gsp_tu10x.bi_ 17.3 MB
info.png 2.1 KB
install_bg.png 60.8 KB
install_bg_rtl.png 61.5 KB
libcuda.so.1.1 8.6 MB
libcuda_loader.so 158.7 KB
libcudadebugger.so.1 9.7 MB
libnvcuvid.so.1 12.4 MB
libnvdxdlkernels.so 122.6 MB
libnvdxgdmal.so.1 54.0 KB
libnvidia-encode.so.1 570.6 KB
libnvidia-ml.so.1 1.6 MB
libnvidia-ml_loader.so 239.4 KB
libnvidia-nvvm.so.4 23.5 MB
libnvidia-opticalflow.so.1 354.4 KB
libnvidia-ptxjitcompiler.so.1 31.6 MB
libnvoptix_loader.so.1 70.9 KB
libnvwgf2umx.so 68.8 MB
license.txt 41.6 KB
mcu.ex_ 551.3 KB
nv-vk32.json 674 B
nv-vk64.json 674 B
nv-vksc64.json 672 B
nv3dappshext.dl_ 534.4 KB
nv3dappshextr.dl_ 36.3 KB
nv_disp.cat 2.4 MB
nv_dispig.inf 800.2 KB
nvaidvc.dl_ 1.5 MB
nvaidvcx.dl_ 1.6 MB
nvaihdr.dl_ 1.9 MB
nvaihdrx.dl_ 2.0 MB
nvapi.dl_ 2.8 MB
nvapi64.dl_ 3.4 MB
nvapo32v.dll 84.0 KB
nvapo64v.dll 95.0 KB
nvcoproc.bi_ 2.1 MB
nvcpl.dll 5.6 MB
nvcubins.bi_ 8.7 MB
nvcuda32.dl_ 8.0 MB
nvcuda64.dl_ 4.7 MB
nvcuda_loader32.dl_ 2.7 MB
nvcuda_loader64.dl_ 1.7 MB
nvcudadebugger.dl_ 2.4 MB
nvcuvid32.dl_ 5.9 MB
nvcuvid64.dl_ 5.4 MB
nvd3dum.dl_ 12.8 MB
nvd3dumx.dl_ 11.9 MB
nvdebugdump.ex_ 223.4 KB
nvdecmftmjpeg.dl_ 286.0 KB
nvdecmftmjpegx.dl_ 350.1 KB
nvdevtools.dl_ 2.2 MB
nvdevtoolsr.dl_ 99.7 KB
nvdispco64.exe 1.6 MB
nvdisps.dll 11.1 MB
nvdispsr.dl_ 6.3 MB
nvdlist.dl_ 137.9 KB
nvdlistx.dl_ 154.5 KB
nvdlppx.dl_ 11.2 MB
nvdrsdb.bi_ 697.6 KB
nvdxdlkernels.dll 126.5 MB
nvdxgdmal32.dl_ 262.9 KB
nvdxgdmal64.dl_ 323.9 KB
nvencmftav1.dl_ 507.0 KB
nvencmftav1x.dl_ 616.9 KB
nvencmfth264.dl_ 511.8 KB
nvencmfth264x.dl_ 622.8 KB
nvencmfthevc.dl_ 514.5 KB
nvencmfthevcx.dl_ 626.1 KB
nvencodeapi.dl_ 414.4 KB
nvencodeapi64.dl_ 520.5 KB
nvfbc.dl_ 693.3 KB
nvfbc64.dl_ 974.5 KB
nvgames.dll 11.9 MB
nvgamesr.dl_ 6.8 MB
nvgpucomp32.dl_ 13.2 MB
nvgpucomp64.dl_ 15.6 MB
nvhda.cat 48.1 KB
nvhda.inf 40.3 KB
nvhda32v.sys 112.5 KB
nvhda64v.sys 128.5 KB
nvhdap32.dll 46.0 KB
nvhdap64.dll 50.5 KB
nviccadvancedcoloridentity.ic_ 2.8 KB
nvidia-smi 712.5 KB
nvidia-smi.ex_ 457.1 KB
nvifr.dl_ 486.8 KB
nvifr64.dl_ 681.3 KB
nvinfo.pb 124.2 KB
nvlddmkm.sy_ 61.9 MB
nvldumd.dl_ 344.2 KB
nvldumdx.dl_ 424.8 KB
nvlicensings.dl_ 2.2 MB
nvlicensingsr.dl_ 105.1 KB
nvml.dll 1.5 MB
nvml_loader.dll 1.0 MB
nvngx.dl_ 256.8 KB
nvngx_dlss.dl_ 12.5 KB
nvngx_update.ex_ 686.7 KB
nvofapi.dl_ 263.3 KB
nvofapi64.dl_ 336.2 KB
nvoglv32.dl_ 12.9 MB
nvoglv64.dl_ 18.6 MB
nvopencl32.dl_ 6.6 MB
nvopencl64.dl_ 4.9 MB
nvoptix.bi_ 105.1 MB
nvoptix.dl_ 31.7 MB
nvpcf.cat 46.8 KB
nvpcf.inf 1.9 KB
nvpcf.sys 240.6 KB
nvpciflt.sy_ 37.2 KB
nvppc.cat 46.9 KB
nvppc.inf 2.6 KB
nvppe.dl_ 509.8 KB
nvppex.dl_ 776.7 KB
nvptxjitcompiler32.dl_ 9.4 MB
nvptxjitcompiler64.dl_ 10.4 MB
nvrtum64.dl_ 34.5 MB
nvsetup.exe 85.1 KB
nvshext.dl_ 82.2 KB
nvsmartmax.dl_ 121.8 KB
nvsmartmax64.dl_ 124.5 KB
nvsmartmaxapp.ex_ 146.9 KB
nvsmartmaxapp64.ex_ 149.6 KB
nvsvc64.dl_ 1.2 MB
nvsvcr.dl_ 651.9 KB
nvsvs.dll 4.8 MB
nvsvsr.dl_ 669.9 KB
nvui.dl_ 3.1 MB
nvuir.dl_ 936.5 KB
nvvgpu64.dl_ 945.0 KB
nvvgpuconfig.dl_ 169.8 KB
nvvgpugsp64.dl_ 727.1 KB
nvvitvs.dll 7.1 MB
nvvitvsr.dl_ 2.9 MB
nvvkscv64.dl_ 4.8 MB
nvvm32.dl_ 33.5 MB
nvvm64.dl_ 37.2 MB
nvwgf2um.dl_ 25.6 MB
nvwgf2umx.dl_ 37.9 MB
nvwss.dll 11.7 MB
nvwssr.dl_ 6.1 MB
nvxdapix.dl_ 4.1 MB
nvxdbat.dl_ 790.5 KB
nvxdplcy.dl_ 889.2 KB
opencl32.dl_ 207.3 KB
opencl64.dl_ 253.7 KB
pcc.ex_ 11.5 MB
presentations_bg.png 139.9 KB
presentations_bg_rtl.png 137.6 KB
radio_btn_selected.png 1.6 KB
radio_btn_unselected.png 1.4 KB
setup.cfg 12.7 KB
setup.exe 645.6 KB
splash.png 157.9 KB
splash_rtl.png 161.0 KB
theme.cfg 8.8 KB
uninstall_bg.png 63.0 KB
uninstall_bg_rtl.png 60.8 KB
vgpuconfig-azure_hci.xm_ 84.4 KB
vgpuconfig-azure_hci_aie.xm_ 109.7 KB
vgpuconfig.xm_ 90.9 KB
vulkan-1-x64.dl_ 542.4 KB
vulkan-1-x86.dl_ 467.0 KB
vulkaninfo-x64.ex_ 811.2 KB
vulkaninfo-x86.ex_ 646.9 KB
warning.png 1.5 KB
nvPerfProvider.man 13.8 KB
nvWmi.mof 145.4 KB
nvWmi64.exe 4.3 MB
FreqTransfer32.exe 3.5 MB
FreqTransfer64.exe 3.8 MB
GreenScreenBG01.jpg 274.9 KB
GreenScreenBG02.jpg 488.0 KB
HighresBlender32.exe 3.6 MB
HighresBlender64.exe 3.9 MB
NvCamera32.dll 7.8 MB
NvCamera64.dll 8.3 MB
NvCameraAllowlisting32.dll 509.5 KB
NvCameraAllowlisting64.dll 652.5 KB
NvCameraEnable.exe 366.5 KB
NvImageConvert32.exe 3.5 MB
NvImageConvert64.exe 3.8 MB
ReShadeFXC32.exe 758.6 KB
ReShadeFXC64.exe 871.1 KB
ShotWithGeforce518x32.rgba 64.7 KB
SphericalEquirect32.exe 3.5 MB
SphericalEquirect64.exe 3.7 MB
Sticker01.png 48.5 KB
Sticker02.png 462.8 KB
Sticker03.png 371.0 KB
Sticker04.png 84.8 KB
Sticker05.png 57.9 KB
Sticker06.png 13.2 KB
Sticker07.png 6.1 KB
Sticker08.png 94.2 KB
d3dcompiler_47_32.dll 3.3 MB
d3dcompiler_47_64.dll 3.9 MB
scratches.jpg 338.2 KB
tools_licenses.txt 15.5 KB
ui.tga 117.4 KB
NVDisplay.Container.exe 1.2 MB
NvContainerRecovery.bat 1.9 KB
NvMessageBus.dll 3.3 MB
dlsargs.xml 544 B
dlsnetparams.csv 338.8 KB
messagebus_client.conf 313 B
nvgwls.exe 3.5 MB
nvtopps.db3 124.0 KB
NvProfileUpdaterPlugin.dll 1.8 MB
_NvGSTPlugin.dll 2.5 MB
nvxdsyncplugin.dll 1.7 MB
wksServicePlugin.dll 307.1 KB
NvXDCore.dll 1.8 MB
NvcDispCorePlugin.dll 509.6 KB
NvcDispWatchdog.dll 742.1 KB
_DisplayDriverRAS.dll 2.4 MB
_NvMsgBusBroadcast.dll 3.3 MB
_nvtopps.dll 11.2 MB
messagebus.conf 313 B
wksServicePluginZ.dll 274.1 KB
Related drivers
- GP106M GeForce GTX 1060 Mobile (v32.0.15.7703)
- TU104M GeForce RTX 2080 Mobile (v32.0.15.7703)
- TU104M GeForce RTX 2080 Mobile (v32.0.15.5597)
- GA107BM GN20-P0-R-K2 GeForce RTX 3050 6GB Laptop GPU (v32.0.15.9194)
- GM108M GeForce 930MX (v32.0.15.7371)
- TU104M GeForce RTX 2070 SUPER Mobile Max-Q (v32.0.15.9166)
- GF108M GeForce GT 620M 630M 635M 640M LE (v9.18.13.697)
- AD106GLM RTX 3000 Ada Generation Laptop GPU (v32.0.15.7371)
- GM108M GeForce MX130 (v32.0.15.8183)
- GP107GLM Quadro P620 (v31.0.15.3818)
Controladores: La Base del Rendimiento Estable de los Dispositivos
¿Por qué son tan importantes los Controladores?
Los controladores desempeñan un papel crucial en la estabilidad del sistema. Los controladores obsoletos o dañados pueden causar:
Se recomienda actualizar los controladores cada 3-6 meses. Esto es especialmente importante antes de instalar un nuevo sistema operativo, ya que los controladores actualizados pueden ser necesarios para garantizar la compatibilidad.
¿Cómo mantener sus Controladores Actualizados?
Método automático para actualizar y descargar drivers (Recomendado):
Si prefieres no buscar manualmente el controlador adecuado, existen herramientas que detectan automáticamente el modelo de tu dispositivo y encuentran un controlador compatible. Esto reduce el riesgo de errores y ahorra tiempo.
Oferta especial
Descargar

Limitations: trial version offers an unlimited number of scans, free driver backup and rollback. Registration for the full version starts from USD 29.95. See more information about Outbyte and uninstall instructions. Please review Outbyte EULA and Privacy Policy
Todos los enlaces han sido escaneados por un programa antivirus.
Instalación manual del controlador
Nota: Instalar una versión incorrecta del controlador puede causar problemas en el sistema. Si no estás seguro de qué controlador elegir, recomendamos usar el método automático.
Descarga el controlador a través del Administrador de dispositivos. Cómo abrir el Administrador de dispositivos:
Cómo instalar controladores usando el Administrador de dispositivos:
Cómo actualizar un controlador de forma gratuita con Outbyte Driver Updater
Mantener los controladores de tu dispositivo actualizados ayuda a garantizar un rendimiento estable de Windows y el funcionamiento correcto del hardware. A continuación se presenta una guía paso a paso que explica cómo actualizar un solo controlador de forma gratuita usando Outbyte Driver Updater. Esta guía describe un método para actualizar un controlador seleccionado sin activar una licencia y sin proporcionar información personal ni detalles de pago.
¿Puedes actualizar un controlador gratis sin registro?
Sí.
Outbyte Driver Updater te permite:
- escanear tu computadora en busca de controladores desactualizados sin costo;
- ver una lista de los controladores detectados;
- actualizar un controlador seleccionado de forma gratuita;
- evitar ingresar una dirección de correo electrónico, nombre, número de tarjeta de crédito o cualquier otro dato personal.
El proceso de actualización gratuita solo requiere el programa instalado y los pasos estándar de escaneo y actualización.
Paso 1: Inicia el programa y escanea tu computadora
Descarga e instala Outbyte Driver Updater en tu PC con Windows.
Después de iniciar el programa, comenzará automáticamente a escanear tu sistema y verificar los controladores instalados.
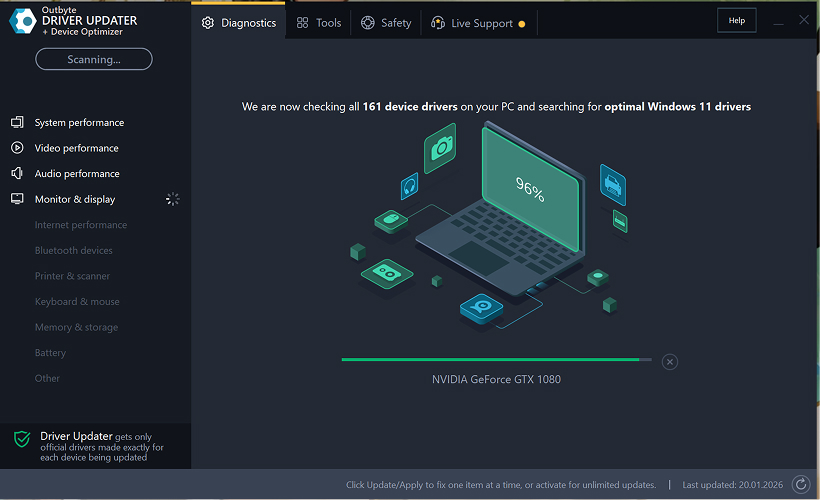
Paso 2: Cierra la ventana de activación
Después del escaneo, puede aparecer una ventana de "Activar ahora".
Para continuar gratis:
- haz clic en el botón de cerrar (X) en la esquina superior derecha de la ventana.
No es necesario ingresar ninguna información
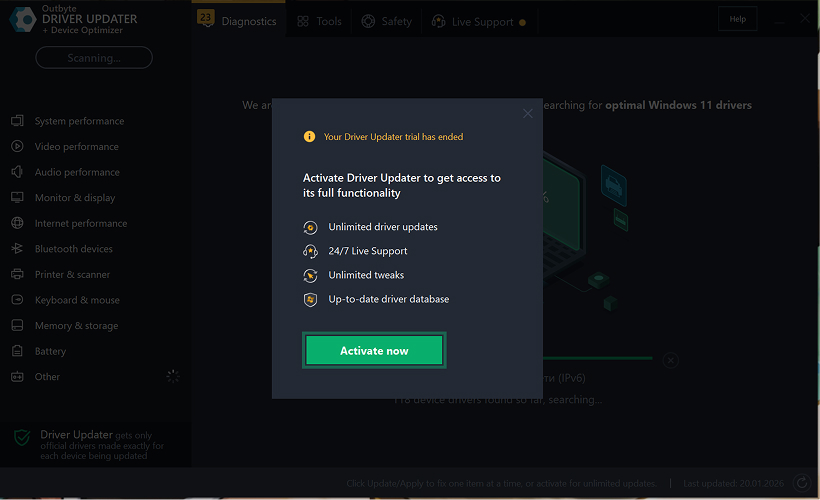
Paso 3: Selecciona la categoría del controlador
Desde el menú de la izquierda, elige la categoría del dispositivo que deseas actualizar, como:
- controladores de audio;
- controladores de video y gráficos;
- controladores de red y Wi-Fi;
- controladores Bluetooth;
- controladores de impresora y escáner.
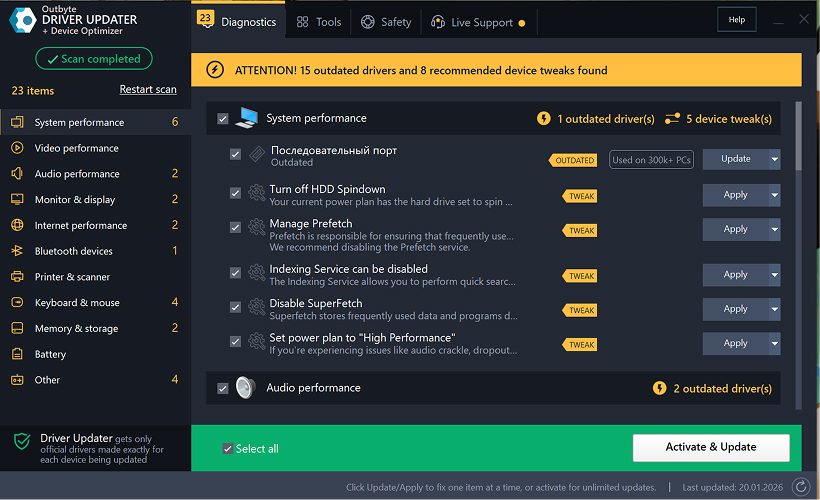
Paso 4: Haz clic en "Actualizar" junto al controlador seleccionado
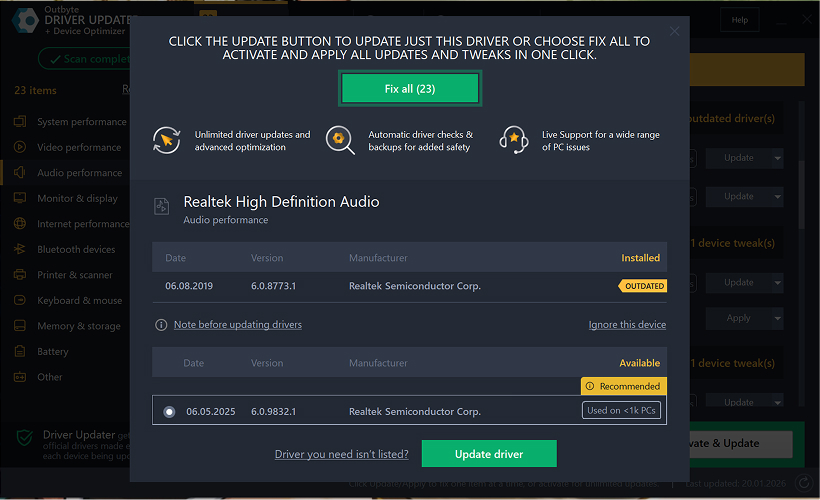
En la lista de controladores, localiza el controlador que deseas actualizar y haz clic en el botón Actualizar junto a él.
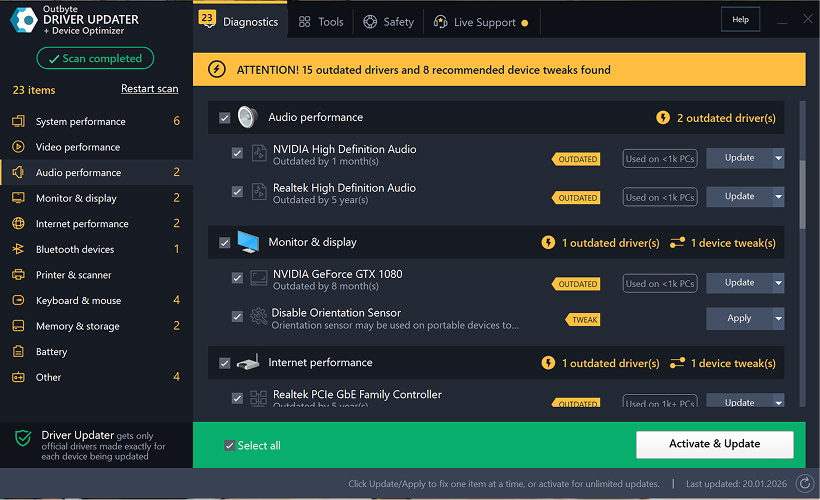
Paso 5: Confirma la actualización del controlador
En la ventana emergente, haz clic en Actualizar controlador.
En esta etapa, no se requieren datos personales ni detalles de pago.
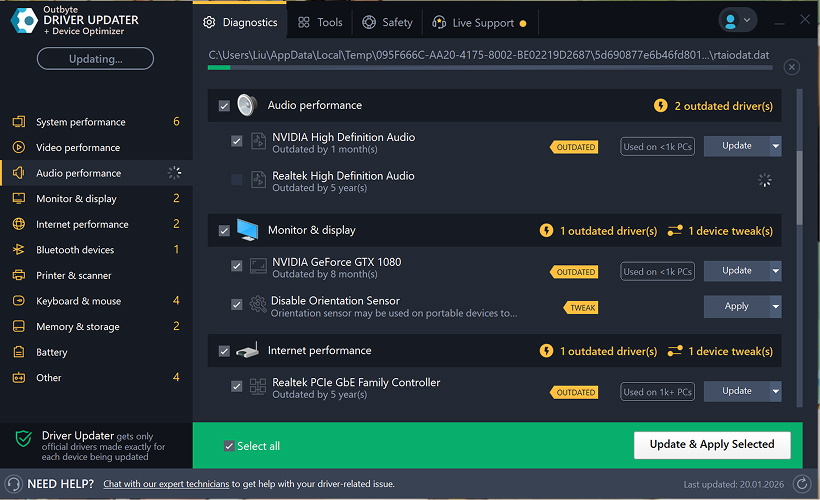
Paso 6: Espera a que finalice el proceso de actualización
El programa comenzará a descargar e instalar el controlador seleccionado.
Por favor, espera hasta que se complete el proceso.
Paso 7: Aplica los cambios y reinicia tu computadora
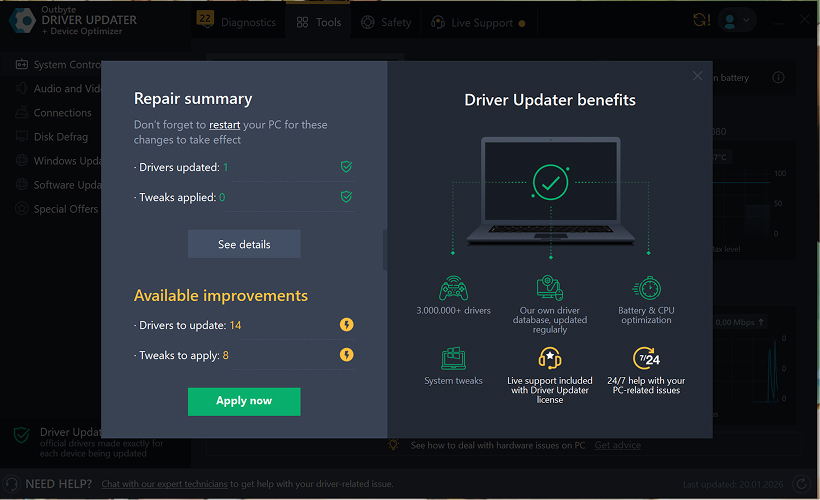
Después de que termine la instalación, haz clic en Aplicar ahora para aplicar los cambios.
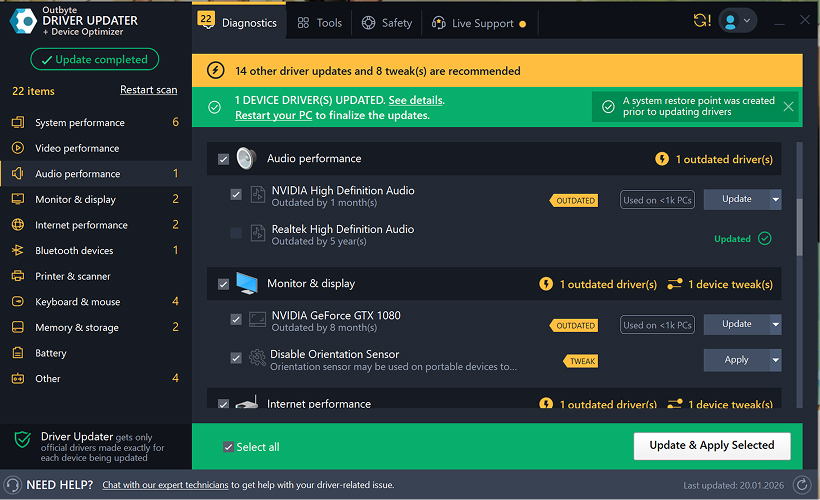
Para asegurar que el controlador actualizado funcione correctamente, reinicia tu computadora.
Notas importantes
- Las actualizaciones gratuitas están disponibles de a un controlador por vez.
- No se requiere registro para la actualización gratuita.
- No se solicita tarjeta de crédito ni información de pago.
- Todas las acciones se realizan localmente dentro del programa después de escanear tu sistema.
- La disponibilidad de actualizaciones gratuitas puede depender del tipo de controlador y la configuración del sistema.
Learn to pair your wireless mouse with a different USB receiver in simple steps. Check compatibility (e.g., Logitech Unifying receivers), install required software/drivers, and use pairing modes to sync devices. Troubleshoot connection issues and optimize performance for seamless use.
Simplify your workspace with Logitech Unifying Software, enabling effortless connection of up to six compatible devices through a single receiver. Enjoy quick setup, clutter-free connectivity, and enhanced productivity as your keyboard, mouse, and other peripherals work in perfect harmony.
Learn how to set up your Epson L3250 printer with this step-by-step guide. Unbox, install ink, connect to power, and download drivers via Epson’s website or included CD. Configure Wi-Fi settings for wireless printing and run a test page to ensure proper installation. Simplify your setup process and start printing effortlessly.
Transform your smartphone into an HD webcam with DroidCam. Enjoy wireless connectivity and seamless video streaming for crystal-clear video calls, live streams, or online meetings. Works with PC/Mac.
Learn how to enable Bluetooth on your PC in a few simple steps. Check compatibility, activate Bluetooth via Windows Settings or the system tray, pair your device, and troubleshoot common issues. This guide ensures seamless wireless connections for headphones, speakers, or peripherals.
Learn how to set up your Epson L3250 printer quickly and efficiently. This guide covers unboxing, installing ink cartridges, connecting to power, and configuring Wi-Fi for seamless wireless printing. Follow step-by-step instructions to install drivers, align the printer head, and troubleshoot common issues. Perfect for home or office use, the Epson L3250 ensures hassle-free installation and high-quality printing, scanning, and copying.
Download the latest Epson L3250 printer drivers and software to ensure seamless connectivity and optimal performance. Compatible with Windows and macOS, these tools enable easy setup, wireless printing, and advanced features. Visit the official Epson support page for secure, up-to-date downloads tailored to your operating system. Simplify installation and maximize your printer’s capabilities with reliable drivers and utilities.
Discover innovative strategies to amplify your message and connect deeply with audiences – no microphone needed. Harness the power of body language, visual storytelling, and creative platforms to make your voice heard in any setting.
The Valeton GP 100 Wah is a professional-grade guitar pedal designed for musicians seeking dynamic sound control and expressive tonal shaping. Featuring a responsive wah circuit, it delivers smooth, vintage-inspired sweeps and modern versatility for rock, funk, blues, and beyond. Built with durable components and an intuitive design, the GP 100 ensures reliable performance on stage or in the studio. Adjustable parameters and a true bypass switch provide seamless integration into any pedalboard setup, while its compact size maximizes space efficiency. Elevate your playing with rich, articulate wah effects tailored to your musical style.
Virtual CloneDrive offers effortless disc image mounting and virtual drive cloning, enabling you to access ISO, BIN, IMG, and other formats without physical media. Streamline workflows, run software, or backup data with a lightweight, user-friendly tool that integrates seamlessly into your system. Simplify disc management and enhance productivity—no hardware required.