Software affidabile

Outbyte Driver Updater
- 1.000.000+ driver
- Scaricato: 1,143,473 volte
- Windows 11 / 10 / 8 / 7





 Scarica
Intel Chipset Device Software
Scarica
Intel Chipset Device Software
Scarica
Intel Chipset Device Software

Informazioni di Sistema
Il tuo PC sta attualmente eseguendo:
Driver details
Driver Name:
Intel Chipset Device Software
Provider:
Intel
Version:
9.4.0.1017
Release Date:
October 30, 2025
Architecture:
x64, x86
File Size:
13.1 MB
Driver ID:
PCI\VEN_8086&DEV_0806
Supported OS:
Windows 8, Windows 7
WHQL:
Signed
Offerta speciale
Scarica
Tutti i link sono stati scansionati da un programma antivirus.
Manual download (.cab, 13.1 MB) from Microsoft servers
— install via Device Manager.
Supported Hardware IDs
PCI\VEN_8086&DEV_0806
PCI\VEN_8086&DEV_0811
PCI\VEN_8086&DEV_0C59
PCI\VEN_8086&DEV_0C5A
PCI\VEN_8086&DEV_0C5B
PCI\VEN_8086&DEV_0C5C
PCI\VEN_8086&DEV_0C5D
PCI\VEN_8086&DEV_0C5E
PCI\VEN_8086&DEV_1C22
PCI\VEN_8086&DEV_1C26
Show all 175 hardware IDs
PCI\VEN_8086&DEV_1C2D
PCI\VEN_8086&DEV_1D22
PCI\VEN_8086&DEV_1D26
PCI\VEN_8086&DEV_1D2D
PCI\VEN_8086&DEV_1D70
PCI\VEN_8086&DEV_1D71
PCI\VEN_8086&DEV_1D72
PCI\VEN_8086&DEV_1E22
PCI\VEN_8086&DEV_1E26
PCI\VEN_8086&DEV_1E2D
PCI\VEN_8086&DEV_2330
PCI\VEN_8086&DEV_2334
PCI\VEN_8086&DEV_2335
PCI\VEN_8086&DEV_24D0
PCI\VEN_8086&DEV_24D2
PCI\VEN_8086&DEV_24D3
PCI\VEN_8086&DEV_24D4
PCI\VEN_8086&DEV_24D7
PCI\VEN_8086&DEV_24DC
PCI\VEN_8086&DEV_24DD
PCI\VEN_8086&DEV_24DE
PCI\VEN_8086&DEV_25A1
PCI\VEN_8086&DEV_25A4
PCI\VEN_8086&DEV_25A9
PCI\VEN_8086&DEV_25AA
PCI\VEN_8086&DEV_25AB
PCI\VEN_8086&DEV_25AC
PCI\VEN_8086&DEV_25AD
PCI\VEN_8086&DEV_25AE
PCI\VEN_8086&DEV_25C0
PCI\VEN_8086&DEV_25D0
PCI\VEN_8086&DEV_25D4
PCI\VEN_8086&DEV_25D8
PCI\VEN_8086&DEV_25E2
PCI\VEN_8086&DEV_25E3
PCI\VEN_8086&DEV_25E4
PCI\VEN_8086&DEV_25E5
PCI\VEN_8086&DEV_25E6
PCI\VEN_8086&DEV_25E7
PCI\VEN_8086&DEV_25F0
PCI\VEN_8086&DEV_25F1
PCI\VEN_8086&DEV_25F3
PCI\VEN_8086&DEV_25F5
PCI\VEN_8086&DEV_25F6
PCI\VEN_8086&DEV_25F7
PCI\VEN_8086&DEV_25F8
PCI\VEN_8086&DEV_25F9
PCI\VEN_8086&DEV_25FA
PCI\VEN_8086&DEV_2640
PCI\VEN_8086&DEV_2641
PCI\VEN_8086&DEV_2642
PCI\VEN_8086&DEV_2658
PCI\VEN_8086&DEV_2659
PCI\VEN_8086&DEV_265A
PCI\VEN_8086&DEV_265B
PCI\VEN_8086&DEV_265C
PCI\VEN_8086&DEV_2660
PCI\VEN_8086&DEV_2662
PCI\VEN_8086&DEV_2664
PCI\VEN_8086&DEV_2666
PCI\VEN_8086&DEV_266A
PCI\VEN_8086&DEV_2670
PCI\VEN_8086&DEV_2688
PCI\VEN_8086&DEV_2689
PCI\VEN_8086&DEV_268A
PCI\VEN_8086&DEV_268B
PCI\VEN_8086&DEV_268C
PCI\VEN_8086&DEV_2690
PCI\VEN_8086&DEV_2692
PCI\VEN_8086&DEV_2694
PCI\VEN_8086&DEV_2696
PCI\VEN_8086&DEV_269B
PCI\VEN_8086&DEV_27B0
PCI\VEN_8086&DEV_27B8
PCI\VEN_8086&DEV_27B9
PCI\VEN_8086&DEV_27BD
PCI\VEN_8086&DEV_27C8
PCI\VEN_8086&DEV_27C9
PCI\VEN_8086&DEV_27CA
PCI\VEN_8086&DEV_27CB
PCI\VEN_8086&DEV_27CC
PCI\VEN_8086&DEV_27D0
PCI\VEN_8086&DEV_27D2
PCI\VEN_8086&DEV_27D4
PCI\VEN_8086&DEV_27D6
PCI\VEN_8086&DEV_27DA
PCI\VEN_8086&DEV_27E0
PCI\VEN_8086&DEV_27E2
PCI\VEN_8086&DEV_2830
PCI\VEN_8086&DEV_2831
PCI\VEN_8086&DEV_2832
PCI\VEN_8086&DEV_2834
PCI\VEN_8086&DEV_2835
PCI\VEN_8086&DEV_2836
PCI\VEN_8086&DEV_283A
PCI\VEN_8086&DEV_283E
PCI\VEN_8086&DEV_2930
PCI\VEN_8086&DEV_2934
PCI\VEN_8086&DEV_2935
PCI\VEN_8086&DEV_2936
PCI\VEN_8086&DEV_2937
PCI\VEN_8086&DEV_2938
PCI\VEN_8086&DEV_2939
PCI\VEN_8086&DEV_293A
PCI\VEN_8086&DEV_293C
PCI\VEN_8086&DEV_3500
PCI\VEN_8086&DEV_3501
PCI\VEN_8086&DEV_3504
PCI\VEN_8086&DEV_3505
PCI\VEN_8086&DEV_350C
PCI\VEN_8086&DEV_350D
PCI\VEN_8086&DEV_3510
PCI\VEN_8086&DEV_3511
PCI\VEN_8086&DEV_3514
PCI\VEN_8086&DEV_3515
PCI\VEN_8086&DEV_3518
PCI\VEN_8086&DEV_3519
PCI\VEN_8086&DEV_3A30
PCI\VEN_8086&DEV_3A34
PCI\VEN_8086&DEV_3A35
PCI\VEN_8086&DEV_3A36
PCI\VEN_8086&DEV_3A37
PCI\VEN_8086&DEV_3A38
PCI\VEN_8086&DEV_3A39
PCI\VEN_8086&DEV_3A3A
PCI\VEN_8086&DEV_3A3C
PCI\VEN_8086&DEV_3A60
PCI\VEN_8086&DEV_3A64
PCI\VEN_8086&DEV_3A65
PCI\VEN_8086&DEV_3A66
PCI\VEN_8086&DEV_3A67
PCI\VEN_8086&DEV_3A68
PCI\VEN_8086&DEV_3A69
PCI\VEN_8086&DEV_3A6A
PCI\VEN_8086&DEV_3A6C
PCI\VEN_8086&DEV_3B30
PCI\VEN_8086&DEV_3B34
PCI\VEN_8086&DEV_3B36
PCI\VEN_8086&DEV_3B37
PCI\VEN_8086&DEV_3B38
PCI\VEN_8086&DEV_3B39
PCI\VEN_8086&DEV_3B3A
PCI\VEN_8086&DEV_3B3B
PCI\VEN_8086&DEV_3B3C
PCI\VEN_8086&DEV_3B3E
PCI\VEN_8086&DEV_3B3F
PCI\VEN_8086&DEV_3B40
PCI\VEN_8086&DEV_8804
PCI\VEN_8086&DEV_8805
PCI\VEN_8086&DEV_8806
PCI\VEN_8086&DEV_8807
PCI\VEN_8086&DEV_880C
PCI\VEN_8086&DEV_880D
PCI\VEN_8086&DEV_880E
PCI\VEN_8086&DEV_880F
PCI\VEN_8086&DEV_8C22
PCI\VEN_8086&DEV_8C26
PCI\VEN_8086&DEV_8C2D
PCI\VEN_8086&DEV_8C31
PCI\VEN_8086&DEV_9C22
PCI\VEN_8086&DEV_9C26
PCI\VEN_8086&DEV_9C2D
PCI\VEN_10EC&DEV_0668&SUBSYS_05D11028
PCI\VEN_8086&DEV_9C16&SUBSYS_06041028
PCI\VEN_8086&DEV_9C43&SUBSYS_06051028
Match against Device Manager → Details → Hardware Ids to confirm this driver fits your device.
All versions of this driver
| Version | Release Date | Architecture | OS | |
|---|---|---|---|---|
| 9.4.0.1027 | November 11, 2013 | x64, x86 | Windows 8.1, Windows 8, Windows 7 | 9.4.0.1027 |
| 10.1.2.10 | January 06, 2016 | x64, x86 | Windows 8.1, Windows 8, Windows 7 | 10.1.2.10 |
| 10.1.20398.8776 | February 23, 2026 | x64, x86 | Windows 11, Windows 10 | 10.1.20398.8776 |
| 9.3.2.1017 | July 28, 2025 | x64, x86 | Windows 10, Windows 8.1, Windows 8 | 9.3.2.1017 |
| 9.2.0.1030 | June 09, 2014 | x86, x64 | Windows 7, Windows XP | 9.2.0.1030 |
| 9.4.0.1026 | March 03, 2026 | x64, x86 | Windows 10, Windows 8.1, Windows 8 | 9.4.0.1026 |
| 10.1.20398.8776 | February 18, 2026 | x64, ARM64 | Windows 11 | 10.1.20398.8776 |
| 10.0.20 | February 11, 2026 | x64, x86 | Windows 8.1, Windows 8, Windows 7 | 10.0.20 |
| 10.1.20062.8627 | October 06, 2025 | x64, x86 | Windows 11, Windows 10 | 10.1.20062.8627 |
| 9.4.0.1017 | October 30, 2025 | x64, x86 | Windows 8, Windows 7 | (this page) |
| 10.0.22 | January 04, 2015 | x64, x86 | Windows 8.1, Windows 8, Windows 7 | 10.0.22 |
Related drivers
- Intel Integrated Sensor Solution Driver (v3.11.100.7733)
- Intel Virtual Buttons Driver (v2.2.1.31)
- Intel Management Engine Interface Driver (v2547.8.50.0)
- Intel Integrated Sensor Solution Driver (v3.10.100.4478)
- Intel Serial IO Driver (v30.100.2416.40)
- Intel NPU Driver (v32.0.100.4512)
- Intel Chipset Device Software (v10.0.22)
- Intel Innovation Platform Framework and Provider Package Driver (v2.3.20200.4422)
- Intel Integrated Sensor Solution Driver (v3.11.100.7720)
- Intel Serial IO Driver (v30.100.2026.14)
Driver: La Base per un Funzionamento Stabile dei Dispositivi
Perché i Driver sono così Importanti?
I driver svolgono un ruolo cruciale nella stabilità del sistema. Driver obsoleti o danneggiati possono causare:
Si consiglia di aggiornare i driver ogni 3-6 mesi. Questo è particolarmente importante prima di installare un nuovo sistema operativo, poiché i driver aggiornati possono essere necessari per garantire la compatibilità.
Come Mantenere Aggiornati i tuoi Driver?
Metodo automatico per aggiornare e scaricare i driver (Consigliato):
Se preferisci non cercare manualmente il driver corretto, esistono strumenti che rilevano automaticamente il modello del tuo dispositivo e trovano un driver compatibile. Questo riduce il rischio di errori e fa risparmiare tempo.
Offerta speciale
Scarica

Limitations: trial version offers an unlimited number of scans, free driver backup and rollback. Registration for the full version starts from USD 29.95. See more information about Outbyte and uninstall instructions. Please review Outbyte EULA and Privacy Policy
Tutti i link sono stati scansionati da un programma antivirus.
Installazione manuale del driver
Nota: L'installazione di un driver errato può causare problemi al sistema. Se non sei sicuro di quale driver scegliere, ti consigliamo il metodo automatico.
Scarica il driver tramite Gestione dispositivi. Come aprire Gestione dispositivi:
Come installare i driver utilizzando Gestione dispositivi:
How to Update a Driver for Free Using Outbyte Driver Updater
Mantenere i driver del dispositivo aggiornati aiuta a garantire prestazioni stabili di Windows e il corretto funzionamento dell'hardware. Di seguito è riportata una guida passo-passo che spiega come aggiornare un singolo driver gratuitamente utilizzando Outbyte Driver Updater. Questa guida descrive un metodo per aggiornare un driver selezionato senza attivare una licenza e senza fornire informazioni personali o dettagli di pagamento.
È Possibile Aggiornare un Driver Gratuitamente Senza Registrazione?
Sì.
Outbyte Driver Updater ti consente di:
- scansionare il tuo computer alla ricerca di driver obsoleti senza costi;
- visualizzare un elenco dei driver rilevati;
- aggiornare un driver selezionato gratuitamente;
- evitare di inserire un indirizzo email, nome, numero di carta di credito o qualsiasi altro dato personale.
Il processo di aggiornamento gratuito richiede solo il programma installato e i passaggi standard di scansione e aggiornamento.
Passaggio 1: Avvia il Programma e Scansiona il Tuo Computer
Scarica e installa Outbyte Driver Updater sul tuo PC Windows.
Dopo aver avviato il programma, inizierà automaticamente a scansionare il tuo sistema e a controllare i driver installati.
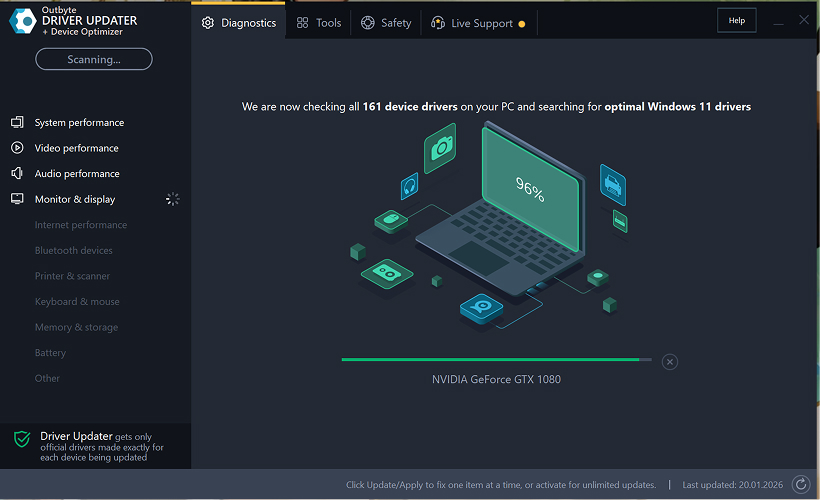
Passaggio 2: Chiudi la Finestra di Attivazione
Dopo la scansione, potrebbe apparire una finestra "Attiva ora".
Per continuare gratuitamente:
- fai clic sul pulsante di chiusura (X) nell'angolo in alto a destra della finestra.
Non è necessario inserire alcuna informazione
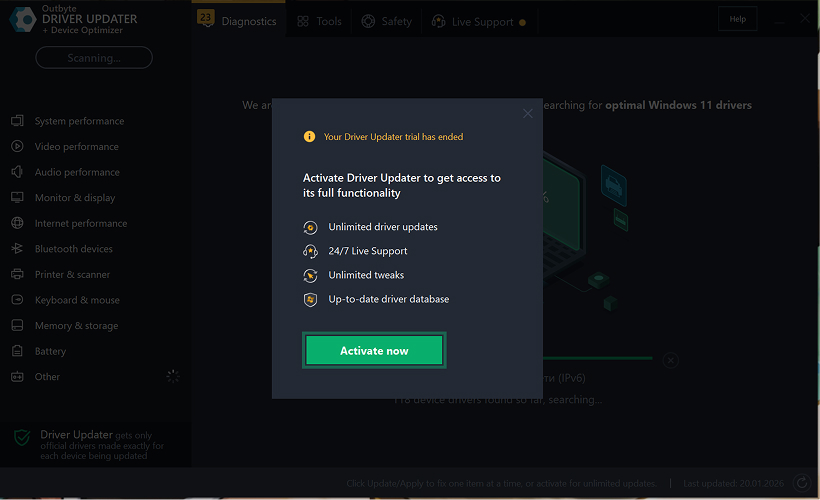
Passaggio 3: Seleziona la Categoria del Driver
Dal menu a sinistra, scegli la categoria del dispositivo che desideri aggiornare, come:
- driver audio;
- driver video e grafici;
- driver di rete e Wi-Fi;
- driver Bluetooth;
- driver di stampanti e scanner.
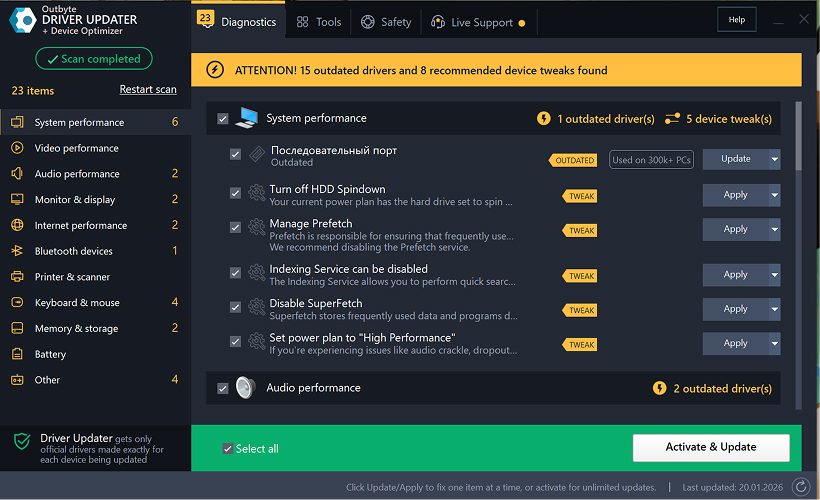
Passaggio 4: Fai Clic su "Aggiorna" Accanto al Driver Selezionato
Nell'elenco dei driver, individua il driver che desideri aggiornare e fai clic sul pulsante Aggiorna accanto ad esso.
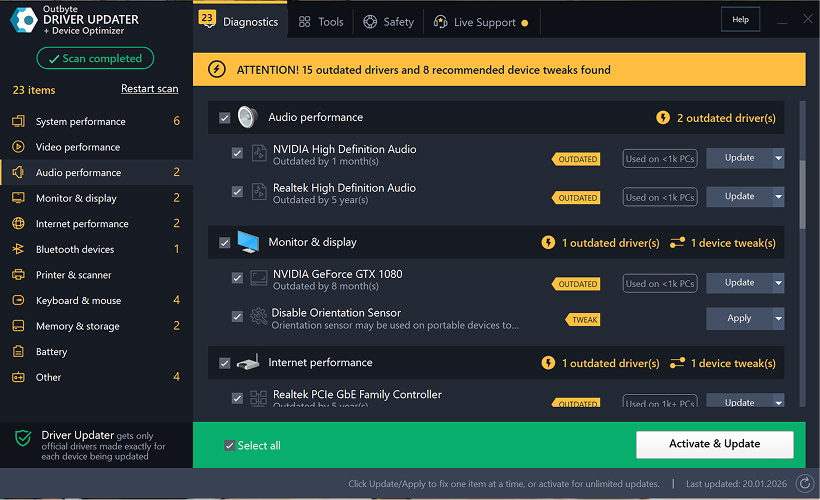
Passaggio 5: Conferma l'Aggiornamento del Driver
Nella finestra popup, fai clic su Aggiorna driver.
In questa fase, non sono richiesti dati personali o dettagli di pagamento.
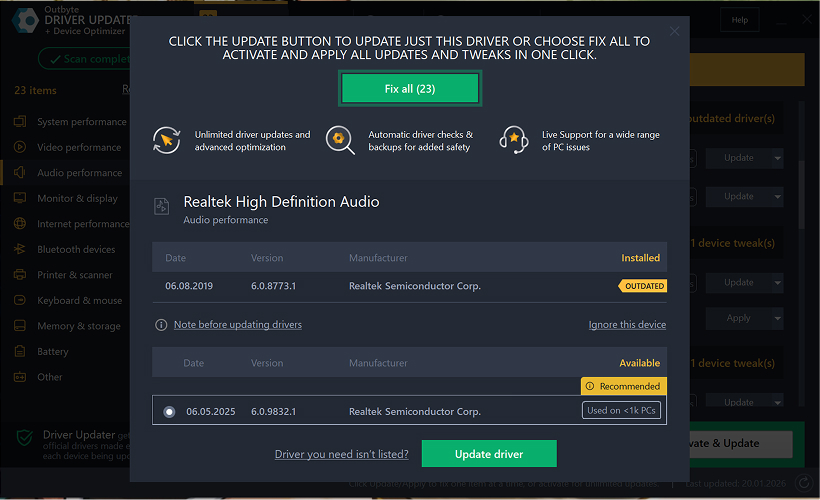
Passaggio 6: Attendi il Completamento del Processo di Aggiornamento
Il programma inizierà a scaricare e installare il driver selezionato.
Attendi fino al completamento del processo.
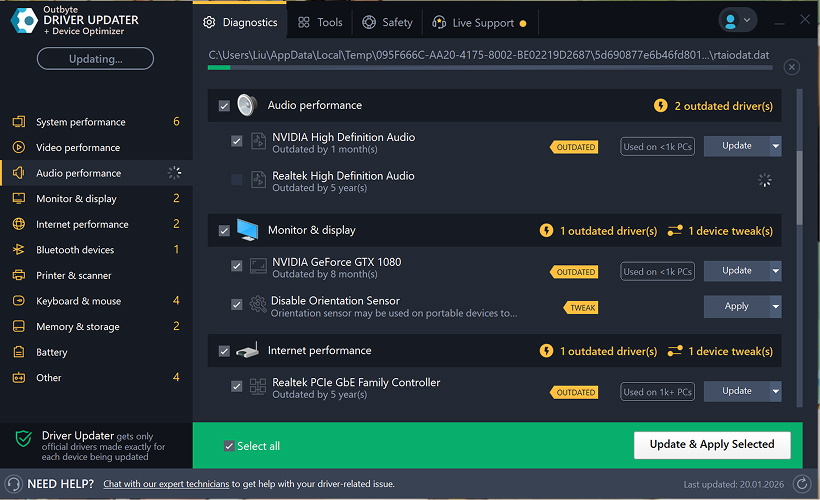
Passaggio 7: Applica le Modifiche e Riavvia il Computer
Al termine dell'installazione, fai clic su Applica ora per applicare le modifiche.
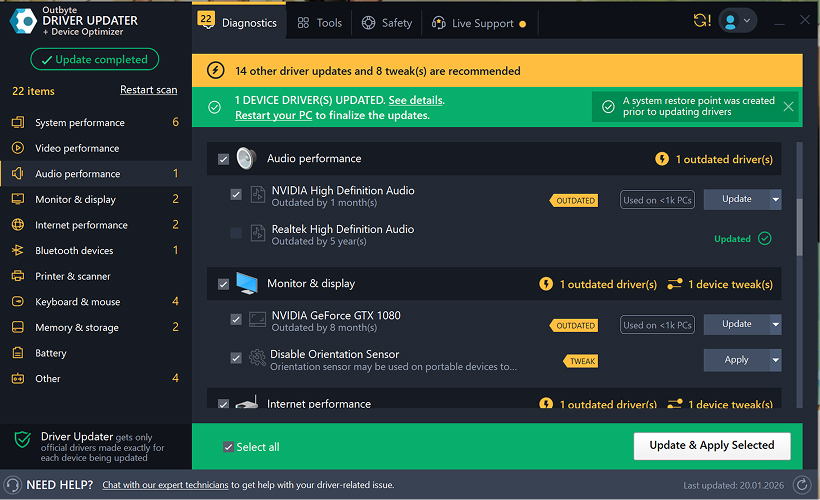
Per garantire che il driver aggiornato funzioni correttamente, riavvia il computer.
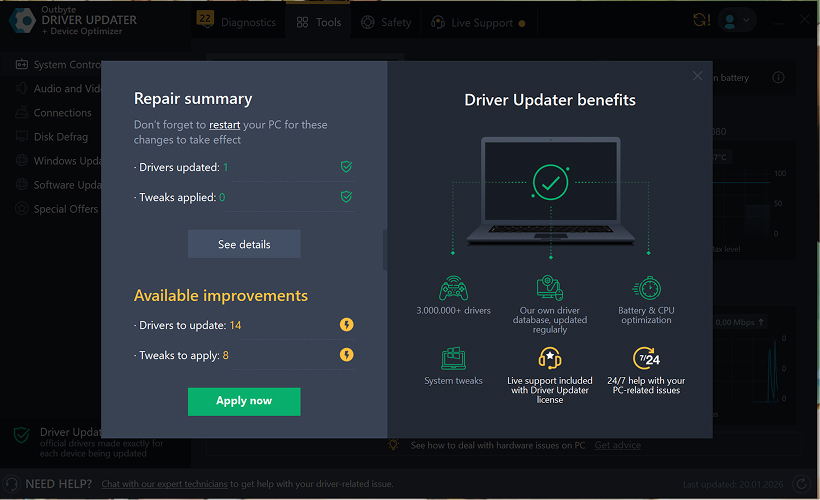
Note Importanti
- Gli aggiornamenti gratuiti sono disponibili un driver alla volta.
- Non è richiesta alcuna registrazione per l'aggiornamento gratuito.
- Non vengono richieste informazioni di carta di credito o di pagamento.
- Tutte le azioni vengono eseguite localmente all'interno del programma dopo la scansione del sistema.
- La disponibilità dell'aggiornamento gratuito può dipendere dal tipo di driver e dalla configurazione del sistema.
Learn to pair your wireless mouse with a different USB receiver in simple steps. Check compatibility (e.g., Logitech Unifying receivers), install required software/drivers, and use pairing modes to sync devices. Troubleshoot connection issues and optimize performance for seamless use.
Simplify your workspace with Logitech Unifying Software, enabling effortless connection of up to six compatible devices through a single receiver. Enjoy quick setup, clutter-free connectivity, and enhanced productivity as your keyboard, mouse, and other peripherals work in perfect harmony.
Learn how to set up your Epson L3250 printer with this step-by-step guide. Unbox, install ink, connect to power, and download drivers via Epson’s website or included CD. Configure Wi-Fi settings for wireless printing and run a test page to ensure proper installation. Simplify your setup process and start printing effortlessly.
Transform your smartphone into an HD webcam with DroidCam. Enjoy wireless connectivity and seamless video streaming for crystal-clear video calls, live streams, or online meetings. Works with PC/Mac.
Learn how to enable Bluetooth on your PC in a few simple steps. Check compatibility, activate Bluetooth via Windows Settings or the system tray, pair your device, and troubleshoot common issues. This guide ensures seamless wireless connections for headphones, speakers, or peripherals.
Learn how to set up your Epson L3250 printer quickly and efficiently. This guide covers unboxing, installing ink cartridges, connecting to power, and configuring Wi-Fi for seamless wireless printing. Follow step-by-step instructions to install drivers, align the printer head, and troubleshoot common issues. Perfect for home or office use, the Epson L3250 ensures hassle-free installation and high-quality printing, scanning, and copying.
Download the latest Epson L3250 printer drivers and software to ensure seamless connectivity and optimal performance. Compatible with Windows and macOS, these tools enable easy setup, wireless printing, and advanced features. Visit the official Epson support page for secure, up-to-date downloads tailored to your operating system. Simplify installation and maximize your printer’s capabilities with reliable drivers and utilities.
Discover innovative strategies to amplify your message and connect deeply with audiences – no microphone needed. Harness the power of body language, visual storytelling, and creative platforms to make your voice heard in any setting.
The Valeton GP 100 Wah is a professional-grade guitar pedal designed for musicians seeking dynamic sound control and expressive tonal shaping. Featuring a responsive wah circuit, it delivers smooth, vintage-inspired sweeps and modern versatility for rock, funk, blues, and beyond. Built with durable components and an intuitive design, the GP 100 ensures reliable performance on stage or in the studio. Adjustable parameters and a true bypass switch provide seamless integration into any pedalboard setup, while its compact size maximizes space efficiency. Elevate your playing with rich, articulate wah effects tailored to your musical style.
Virtual CloneDrive offers effortless disc image mounting and virtual drive cloning, enabling you to access ISO, BIN, IMG, and other formats without physical media. Streamline workflows, run software, or backup data with a lightweight, user-friendly tool that integrates seamlessly into your system. Simplify disc management and enhance productivity—no hardware required.