Zaufane Oprogramowanie

Outbyte Driver Updater
- Ponad 1 000 000 sterowników
- Pobrano: 1143473 razy
- Windows 11 / 10 / 8 / 7





 Pobierz
CoffeeLake-H GT2 UHD Graphics 630
Pobierz
CoffeeLake-H GT2 UHD Graphics 630
Pobierz
CoffeeLake-H GT2 UHD Graphics 630

Informacje o Systemie
Twój komputer działa obecnie na:
Driver details
Driver Name:
CoffeeLake-H GT2 UHD Graphics 630
Provider:
Intel Corporation
Version:
30.0.101.1404
Release Date:
2/18/2022
Architecture:
AMD64
File Size:
416.1 MB
Driver ID:
pci\ven_8086&dev_3e9b&subsys_8610103c
Supported OS:
Windows 10
WHQL:
Signed
Oferta specjalna
Pobierz
Wszystkie linki zostały przeskanowane przez program antywirusowy.
Manual download (.cab, 416.1 MB) from Microsoft servers
— install via Device Manager.
Compatible hardware
- CoffeeLake-H GT2 [UHD Graphics 630] (Intel Corporation)
- Coffee Lake-S GT2 [UHD Graphics P630] (Intel Corporation)
- WhiskeyLake-U GT2 [UHD Graphics 620] (Intel Corporation)
- Whiskey Lake-U GT1 [UHD Graphics 610] (Intel Corporation)
- Kaby Lake-R GT2 [UHD Graphics 620] (Intel Corporation)
- UHD Graphics 615 (Intel Corporation)
- GeminiLake [UHD Graphics 605] (Intel Corporation)
- GeminiLake [UHD Graphics 600] (Intel Corporation)
- Kaby Lake-U GT1 [HD Graphics 610] (Intel Corporation)
- Kaby Lake-U GT2 [HD Graphics 620] (Intel Corporation)
- Kaby Lake-Y GT2 [HD Graphics 615] (Intel Corporation)
- CometLake-U GT2 [UHD Graphics] (Intel Corporation)
- Comet Lake-U GT2 [UHD Graphics 620] (Intel Corporation)
- Comet Lake UHD Graphics (Intel Corporation)
- CometLake-H GT2 [UHD Graphics] (Intel Corporation)
- UHD Graphics 617 (Intel Corporation)
- TigerLake-LP GT2 [Iris Xe Graphics] (Intel Corporation)
- Tiger Lake-LP GT2 [UHD Graphics G4] (Intel Corporation)
- TigerLake-H GT1 [UHD Graphics] (Intel Corporation)
- Tiger Lake-H GT1 [UHD Graphics] (Intel Corporation)
- Tiger Lake-UP4 GT2 [Iris Xe Graphics] (Intel Corporation)
- JasperLake [UHD Graphics] (Intel Corporation)
Supported Hardware IDs
hdaudio\func_01&ven_8086&dev_2811
hdaudio\func_01&ven_8086&dev_2811&subsys_80860101
hdaudio\func_01&ven_8086&dev_2812
hdaudio\func_01&ven_8086&dev_2812&subsys_80860101
hdaudio\func_01&ven_8086&dev_2815
hdaudio\func_01&ven_8086&dev_2815&subsys_80860101
hdaudio\func_01&ven_8086&dev_2816
hdaudio\func_01&ven_8086&dev_2816&subsys_80860101
hdaudio\func_01&ven_8086&dev_281b
hdaudio\func_01&ven_8086&dev_281b&subsys_80860101
Show all 220 hardware IDs
hdaudio\sgpc_func_01&ven_8086&dev_2811
hdaudio\sgpc_func_01&ven_8086&dev_2811&subsys_80860101
intelaudio\func_01&ven_8086&dev_2811
intelaudio\func_01&ven_8086&dev_2811&subsys_80860101
intelaudio\func_01&ven_8086&dev_2812
intelaudio\func_01&ven_8086&dev_2812&subsys_80860101
intelaudio\func_01&ven_8086&dev_2815
intelaudio\func_01&ven_8086&dev_2815&subsys_80860101
intelaudio\func_01&ven_8086&dev_2816
intelaudio\func_01&ven_8086&dev_2816&subsys_80860101
intelaudio\func_01&ven_8086&dev_281b
intelaudio\func_01&ven_8086&dev_281b&subsys_80860101
pci\ven_8086&dev_3184&subsys_8521103c
pci\ven_8086&dev_3185&subsys_8521103c
pci\ven_8086&dev_3e94&subsys_860c103c
pci\ven_8086&dev_3e94&subsys_860d103c
pci\ven_8086&dev_3e94&subsys_860f103c
pci\ven_8086&dev_3e94&subsys_8610103c
pci\ven_8086&dev_3e94&subsys_8736103c
pci\ven_8086&dev_3e94&subsys_8737103c
pci\ven_8086&dev_3e94&subsys_8780103c
pci\ven_8086&dev_3e94&subsys_8781103c
pci\ven_8086&dev_3e94&subsys_8783103c
pci\ven_8086&dev_3e94&subsys_8784103c
pci\ven_8086&dev_3e9b&subsys_856f103c
pci\ven_8086&dev_3e9b&subsys_860c103c
pci\ven_8086&dev_3e9b&subsys_860d103c
pci\ven_8086&dev_3e9b&subsys_860f103c
pci\ven_8086&dev_3e9b&subsys_8610103c
pci\ven_8086&dev_3e9b&subsys_8736103c
pci\ven_8086&dev_3e9b&subsys_8737103c
pci\ven_8086&dev_3e9b&subsys_8780103c
pci\ven_8086&dev_3e9b&subsys_8781103c
pci\ven_8086&dev_3e9b&subsys_8783103c
pci\ven_8086&dev_3e9b&subsys_8784103c
pci\ven_8086&dev_3ea0&subsys_8536103c
pci\ven_8086&dev_3ea0&subsys_8537103c
pci\ven_8086&dev_3ea0&subsys_8538103c
pci\ven_8086&dev_3ea0&subsys_8548103c
pci\ven_8086&dev_3ea0&subsys_8549103c
pci\ven_8086&dev_3ea0&subsys_854a103c
pci\ven_8086&dev_3ea0&subsys_856d103c
pci\ven_8086&dev_3ea0&subsys_856e103c
pci\ven_8086&dev_3ea0&subsys_857f103c
pci\ven_8086&dev_3ea0&subsys_85a3103c
pci\ven_8086&dev_3ea0&subsys_85a5103c
pci\ven_8086&dev_3ea0&subsys_85aa103c
pci\ven_8086&dev_3ea0&subsys_85b9103c
pci\ven_8086&dev_3ea0&subsys_861f103c
pci\ven_8086&dev_3ea0&subsys_8637103c
pci\ven_8086&dev_3ea0&subsys_8655103c
pci\ven_8086&dev_3ea1&subsys_8536103c
pci\ven_8086&dev_3ea1&subsys_8537103c
pci\ven_8086&dev_3ea1&subsys_8538103c
pci\ven_8086&dev_3ea1&subsys_85a3103c
pci\ven_8086&dev_3ea1&subsys_85a5103c
pci\ven_8086&dev_3ea1&subsys_85aa103c
pci\ven_8086&dev_4e55&subsys_887d103c
pci\ven_8086&dev_4e61&subsys_887d103c
pci\ven_8086&dev_4e71&subsys_887d103c
pci\ven_8086&dev_5906&subsys_8470103c
pci\ven_8086&dev_5916&subsys_8470103c
pci\ven_8086&dev_5917&subsys_8470103c
pci\ven_8086&dev_5917&subsys_853d103c
pci\ven_8086&dev_591c&subsys_8524103c
pci\ven_8086&dev_591e&subsys_846f103c
pci\ven_8086&dev_87ca&subsys_86d0103c
pci\ven_8086&dev_9a40&subsys_888c103c
pci\ven_8086&dev_9a49&subsys_870d103c
pci\ven_8086&dev_9a49&subsys_8716103c
pci\ven_8086&dev_9a49&subsys_8720103c
pci\ven_8086&dev_9a49&subsys_87df103c
pci\ven_8086&dev_9a49&subsys_87e0103c
pci\ven_8086&dev_9a49&subsys_87e1103c
pci\ven_8086&dev_9a49&subsys_87e2103c
pci\ven_8086&dev_9a49&subsys_87ea103c
pci\ven_8086&dev_9a49&subsys_87eb103c
pci\ven_8086&dev_9a49&subsys_87ed103c
pci\ven_8086&dev_9a49&subsys_8806103c
pci\ven_8086&dev_9a49&subsys_8807103c
pci\ven_8086&dev_9a49&subsys_8808103c
pci\ven_8086&dev_9a49&subsys_8809103c
pci\ven_8086&dev_9a49&subsys_880d103c
pci\ven_8086&dev_9a49&subsys_8846103c
pci\ven_8086&dev_9a49&subsys_8847103c
pci\ven_8086&dev_9a49&subsys_8890103c
pci\ven_8086&dev_9a49&subsys_8a73103c
pci\ven_8086&dev_9a49&subsys_8a74103c
pci\ven_8086&dev_9a49&subsys_8a75103c
pci\ven_8086&dev_9a49&subsys_8a76103c
pci\ven_8086&dev_9a49&subsys_8a77103c
pci\ven_8086&dev_9a49&subsys_8a83103c
pci\ven_8086&dev_9a49&subsys_8a84103c
pci\ven_8086&dev_9a49&subsys_8a85103c
pci\ven_8086&dev_9a49&subsys_8a86103c
pci\ven_8086&dev_9a49&subsys_8a87103c
pci\ven_8086&dev_9a49&subsys_8aac103c
pci\ven_8086&dev_9a49&subsys_8aae103c
pci\ven_8086&dev_9a49&subsys_8ab1103c
pci\ven_8086&dev_9a49&subsys_8ab3103c
pci\ven_8086&dev_9a49&subsys_8ab7103c
pci\ven_8086&dev_9a49&subsys_8ab8103c
pci\ven_8086&dev_9a60&subsys_886d103c
pci\ven_8086&dev_9a60&subsys_886e103c
pci\ven_8086&dev_9a60&subsys_8870103c
pci\ven_8086&dev_9a60&subsys_8871103c
pci\ven_8086&dev_9a60&subsys_8873103c
pci\ven_8086&dev_9a60&subsys_8874103c
pci\ven_8086&dev_9a60&subsys_888d103c
pci\ven_8086&dev_9a68&subsys_886d103c
pci\ven_8086&dev_9a68&subsys_886e103c
pci\ven_8086&dev_9a68&subsys_8870103c
pci\ven_8086&dev_9a68&subsys_8871103c
pci\ven_8086&dev_9a68&subsys_8873103c
pci\ven_8086&dev_9a68&subsys_8874103c
pci\ven_8086&dev_9a68&subsys_888d103c
pci\ven_8086&dev_9a70&subsys_886d103c
pci\ven_8086&dev_9a70&subsys_886e103c
pci\ven_8086&dev_9a70&subsys_8870103c
pci\ven_8086&dev_9a70&subsys_8871103c
pci\ven_8086&dev_9a70&subsys_8873103c
pci\ven_8086&dev_9a70&subsys_8874103c
pci\ven_8086&dev_9a70&subsys_888d103c
pci\ven_8086&dev_9a78&subsys_870d103c
pci\ven_8086&dev_9a78&subsys_8716103c
pci\ven_8086&dev_9a78&subsys_8720103c
pci\ven_8086&dev_9a78&subsys_87df103c
pci\ven_8086&dev_9a78&subsys_87e0103c
pci\ven_8086&dev_9a78&subsys_87e1103c
pci\ven_8086&dev_9a78&subsys_87e2103c
pci\ven_8086&dev_9a78&subsys_87ea103c
pci\ven_8086&dev_9a78&subsys_87ed103c
pci\ven_8086&dev_9a78&subsys_8806103c
pci\ven_8086&dev_9a78&subsys_8807103c
pci\ven_8086&dev_9a78&subsys_8808103c
pci\ven_8086&dev_9a78&subsys_8809103c
pci\ven_8086&dev_9a78&subsys_880d103c
pci\ven_8086&dev_9a78&subsys_8846103c
pci\ven_8086&dev_9a78&subsys_8847103c
pci\ven_8086&dev_9a78&subsys_888c103c
pci\ven_8086&dev_9a78&subsys_8890103c
pci\ven_8086&dev_9a78&subsys_8a73103c
pci\ven_8086&dev_9a78&subsys_8a74103c
pci\ven_8086&dev_9a78&subsys_8a75103c
pci\ven_8086&dev_9a78&subsys_8a76103c
pci\ven_8086&dev_9a78&subsys_8a77103c
pci\ven_8086&dev_9a78&subsys_8a83103c
pci\ven_8086&dev_9a78&subsys_8a84103c
pci\ven_8086&dev_9a78&subsys_8a85103c
pci\ven_8086&dev_9a78&subsys_8a86103c
pci\ven_8086&dev_9a78&subsys_8a87103c
pci\ven_8086&dev_9a78&subsys_8aac103c
pci\ven_8086&dev_9a78&subsys_8aae103c
pci\ven_8086&dev_9a78&subsys_8ab1103c
pci\ven_8086&dev_9a78&subsys_8ab3103c
pci\ven_8086&dev_9a78&subsys_8ab7103c
pci\ven_8086&dev_9a78&subsys_8ab8103c
pci\ven_8086&dev_9b21&subsys_869b103c
pci\ven_8086&dev_9b21&subsys_869d103c
pci\ven_8086&dev_9b21&subsys_86a0103c
pci\ven_8086&dev_9b21&subsys_86a3103c
pci\ven_8086&dev_9b21&subsys_86a5103c
pci\ven_8086&dev_9b21&subsys_86a8103c
pci\ven_8086&dev_9b21&subsys_877d103c
pci\ven_8086&dev_9b41&subsys_869b103c
pci\ven_8086&dev_9b41&subsys_869d103c
pci\ven_8086&dev_9b41&subsys_86a0103c
pci\ven_8086&dev_9b41&subsys_86a3103c
pci\ven_8086&dev_9b41&subsys_86a5103c
pci\ven_8086&dev_9b41&subsys_86a8103c
pci\ven_8086&dev_9b41&subsys_8723103c
pci\ven_8086&dev_9b41&subsys_8724103c
pci\ven_8086&dev_9b41&subsys_8725103c
pci\ven_8086&dev_9b41&subsys_8726103c
pci\ven_8086&dev_9b41&subsys_8727103c
pci\ven_8086&dev_9b41&subsys_8736103c
pci\ven_8086&dev_9b41&subsys_8737103c
pci\ven_8086&dev_9b41&subsys_876d103c
pci\ven_8086&dev_9b41&subsys_882c103c
pci\ven_8086&dev_9b41&subsys_882d103c
pci\ven_8086&dev_9bac&subsys_876d103c
pci\ven_8086&dev_9bc4&subsys_8736103c
pci\ven_8086&dev_9bc4&subsys_8737103c
pci\ven_8086&dev_9bc4&subsys_8780103c
pci\ven_8086&dev_9bc4&subsys_8781103c
pci\ven_8086&dev_9bc4&subsys_8783103c
pci\ven_8086&dev_9bc4&subsys_8784103c
pci\ven_8086&dev_9bc4&subsys_87ec103c
pci\ven_8086&dev_9bca&subsys_869b103c
pci\ven_8086&dev_9bca&subsys_869d103c
pci\ven_8086&dev_9bca&subsys_86a0103c
pci\ven_8086&dev_9bca&subsys_86a3103c
pci\ven_8086&dev_9bca&subsys_86a5103c
pci\ven_8086&dev_9bca&subsys_86a8103c
pci\ven_8086&dev_9bca&subsys_8723103c
pci\ven_8086&dev_9bca&subsys_8724103c
pci\ven_8086&dev_9bca&subsys_8725103c
pci\ven_8086&dev_9bca&subsys_8726103c
pci\ven_8086&dev_9bca&subsys_8727103c
pci\ven_8086&dev_9bca&subsys_876d103c
pci\ven_8086&dev_9bca&subsys_882c103c
pci\ven_8086&dev_9bca&subsys_882d103c
pci\ven_8086&dev_9bcc&subsys_876d103c
pci\ven_8086&dev_9bf6&subsys_8736103c
pci\ven_8086&dev_9bf6&subsys_8737103c
pci\ven_8086&dev_9bf6&subsys_8780103c
pci\ven_8086&dev_9bf6&subsys_8781103c
pci\ven_8086&dev_9bf6&subsys_8783103c
pci\ven_8086&dev_9bf6&subsys_8784103c
pci\ven_8086&dev_9bf6&subsys_87ec103c
Match against Device Manager → Details → Hardware Ids to confirm this driver fits your device.
File details
File name:
be90cfa4-4672-4381-af1c-ea82203faa0b_7e386f99ab7f2082188c5b96f994d8adea54444b.cab
File size:
436294325 bytes (416.0 MB)
Signed / DriverVer:
11/21/2021,11.2.0.10
Provider (INF):
Intel(R) Corporation
Catalog file:
IntcDAud.cat
SHA-256:
bf98ab40653fcc8a4ccdc3182111cd01debfa6bf477f70dbc7ea62036228e1f6
To verify: open PowerShell and run Get-FileHash <filename.cab>
What's inside the package (226 files)
AGS.dll 61.1 KB
AGSOfflinePackage.zip 626.6 KB
ColorImageEnhancement.wmv 366.3 KB
ControlLib.dll 238.3 KB
ControlLib32.dll 193.0 KB
DnnlPlugin.dll 47.8 MB
FilmModeDetection.wmv 626.4 KB
GSCAuxDriver.inf 11.9 KB
GSCAuxDriverx64.sys 86.5 KB
GfxDownloadWrapper.exe 159.6 KB
HdBusExt.inf 7.3 KB
ImageStabilization.wmv 394.2 KB
IntelControlLib.dll 394.9 KB
IntelControlLib32.dll 332.6 KB
IntelCpHDCPSvc.exe 338.0 KB
IntelCpHeciSvc.exe 510.0 KB
IntelGpuCompiler32.dll 126.3 KB
IntelGpuCompiler64.dll 164.3 KB
IntelGraphicsAGS.exe 78.5 KB
Intel_OpenCL_ICD32.dll 361.8 KB
Intel_OpenCL_ICD64.dll 496.8 KB
LiteDB.dll 365.8 KB
MSHdaDac.inf 30.3 KB
NLog.config 1.9 KB
NLog.dll 874.8 KB
Newtonsoft.Json.dll 702.8 KB
OSSCOPYRIGHT.txt 1.3 KB
OneApp.IGCC.COMLibrary.dll 25.8 KB
OneApp.IGCC.CommunicationService.dll 33.8 KB
OneApp.IGCC.CoreLibrary.dll 838.8 KB
OneApp.IGCC.WinService.exe 87.0 KB
OneApp.IGCC.WinService.exe.config 1.6 KB
OpromUpdateTool.exe 183.5 KB
TeeDriverGscW8x64.sys 258.5 KB
UMED.dll 148.6 KB
UniversalAdapter32.dll 286.2 KB
UniversalAdapter64.dll 344.4 KB
VulkanRT-EULA.txt 3.9 KB
acxdac.cat 48.8 KB
c_32.cpa 1.2 MB
c_64.cpa 1.3 MB
clangFEWrapper.dll 31.1 MB
clangFEWrapper32.dll 24.6 MB
cp_resources.bin 2.4 MB
cpa_32.vp 1.0 KB
cpa_64.vp 1.0 KB
cui_dch.inf 39.5 KB
dev_32.vp 55.8 KB
dev_64.vp 55.0 KB
gscauxdriver.cat 49.3 KB
gscheci.cat 49.2 KB
gscheci.inf 12.3 KB
h265e_32.vp 73.9 KB
h265e_64.vp 13.3 KB
hdbusext.cat 48.8 KB
he_32.vp 72.2 KB
he_64.vp 12.7 KB
ig11icd32.dll 13.1 MB
ig11icd64.dll 16.4 MB
ig9icd32.dll 12.7 MB
ig9icd64.dll 16.0 MB
iga32.dll 2.3 MB
iga64.dll 2.9 MB
igc32.dll 46.6 MB
igc64.dll 55.0 MB
igcc_dch.inf 5.8 KB
igd10iumd32.dll 1.8 MB
igd10iumd64.dll 1.9 MB
igd10mg32.dll 1.8 MB
igd10mg64.dll 1.8 MB
igd10um32gen11.dll 8.6 MB
igd10um32xe.dll 18.5 MB
igd10um64gen11.dll 11.2 MB
igd10um64xe.dll 20.3 MB
igd11dxva32.dll 73.4 MB
igd11dxva64.dll 74.7 MB
igd12dxva32.dll 72.9 MB
igd12dxva64.dll 74.2 MB
igd12um32icl.dll 9.5 MB
igd12um32kbl.dll 9.4 MB
igd12um32xel.dll 9.7 MB
igd12um64icl.dll 10.0 MB
igd12um64kbl.dll 9.9 MB
igd12um64xel.dll 10.1 MB
igd12umd32.dll 113.0 KB
igd12umd64.dll 149.0 KB
igd9dxva32.dll 60.3 MB
igd9dxva64.dll 61.6 MB
igdail32.dll 164.9 KB
igdail64.dll 199.8 KB
igdde32.dll 343.4 KB
igdde64.dll 421.1 KB
igdext32.dll 240.2 KB
igdext64.dll 296.4 KB
igdfcl32.dll 950.8 KB
igdfcl64.dll 1.0 MB
igdgmm32.dll 3.0 MB
igdgmm64.dll 3.8 MB
igdinfo32.dll 138.0 KB
igdinfo64.dll 162.9 KB
igdkmd64.sys 38.3 MB
igdkmdn64.sys 38.6 MB
igdkmdnd64.sys 38.6 MB
igdlh.cat 9.1 MB
igdmd32.dll 5.1 MB
igdmd64.dll 6.5 MB
igdml32.dll 2.3 MB
igdml64.dll 3.0 MB
igdrcl32.dll 4.5 MB
igdrcl64.dll 5.2 MB
igdumdim32.dll 1.4 MB
igdumdim64.dll 1.6 MB
igfx11cmrt32.dll 179.7 KB
igfx11cmrt64.dll 223.9 KB
igfxCUIService.exe 392.0 KB
igfxCUIServiceN.exe 391.5 KB
igfxCUIServicePS.dll 403.3 KB
igfxCUIServicePSN.dll 404.3 KB
igfxDH.dll 962.8 KB
igfxDHN.dll 955.8 KB
igfxDI.dll 417.3 KB
igfxDIN.dll 371.3 KB
igfxEM.exe 752.0 KB
igfxEMN.exe 746.0 KB
igfxLHM.dll 2.1 MB
igfxSDK.exe 972.6 KB
igfxSDKLib.dll 97.8 KB
igfxcmrt32.dll 177.7 KB
igfxcmrt64.dll 219.9 KB
igfxexps.dll 59.9 KB
igfxexps32.dll 51.3 KB
igfxext.exe 337.0 KB
igfxextN.exe 339.0 KB
iglhxa64.cpa 1.3 MB
iglhxa64.vp 1.0 KB
iglhxc64.vp 43.1 KB
iglhxc64_dev.vp 42.2 KB
iglhxg64.vp 42.7 KB
iglhxg64_dev.vp 42.7 KB
iglhxo64.vp 41.5 KB
iglhxo64_dev.vp 42.1 KB
iglhxs64.vp 5.7 KB
iglhxsn64.vp 6.3 KB
iglhxsnd64.vp 6.3 KB
igsc.dll 185.4 KB
igvk32.dll 18.6 MB
igvk32.json 135 B
igvk64.dll 20.6 MB
igvk64.json 135 B
igxelpicd32.dll 12.9 MB
igxelpicd64.dll 15.9 MB
igxelpplusicd32.dll 12.9 MB
igxelpplusicd64.dll 15.9 MB
iigd_dch.inf 850.9 KB
iigd_dch_d.inf 287.8 KB
intel_gfx_api-x64.dll 588.8 KB
intel_gfx_api-x86.dll 451.1 KB
libLLVM-9.so 36.7 MB
libUniversalAdapter64.so 494.0 KB
libigc.so 39.3 MB
libigd12um64icl.so 4.4 MB
libigd12um64kbl.so 4.3 MB
libigd12um64xel.so 4.7 MB
libigd12umd64.so 42.1 KB
libigdfcl.so 949.7 KB
libigdgmm.so.12 2.1 MB
libmfx32-gen.dll 22.4 MB
libmfx64-gen.dll 23.6 MB
libmfxhw32.dll 26.3 MB
libmfxhw64.dll 27.8 MB
libopencl-clang.so.9 77.1 MB
libwsl_compute_helper.so 1.0 MB
memcntrl.inf 3.4 KB
mfx_loader_dll_hw32.dll 703.2 KB
mfx_loader_dll_hw64.dll 938.8 KB
mfx_mft_av1hve_32.dll 2.3 MB
mfx_mft_av1hve_32.vp 73.5 KB
mfx_mft_av1hve_64.dll 2.9 MB
mfx_mft_av1hve_64.vp 13.1 KB
mfx_mft_encrypt_32.dll 2.2 MB
mfx_mft_encrypt_64.dll 2.7 MB
mfx_mft_h264ve_32.dll 2.3 MB
mfx_mft_h264ve_64.dll 2.8 MB
mfx_mft_h265ve_32.dll 2.3 MB
mfx_mft_h265ve_64.dll 2.9 MB
mfx_mft_mjpgvd_32.dll 2.2 MB
mfx_mft_mjpgvd_64.dll 2.7 MB
mfx_mft_vp9ve_32.dll 2.3 MB
mfx_mft_vp9ve_64.dll 2.9 MB
mfxplugin32_av1e_gacc.dll 8.2 MB
mfxplugin32_hw.dll 19.6 MB
mfxplugin64_av1e_gacc.dll 12.0 MB
mfxplugin64_hw.dll 26.6 MB
mj_32.vp 68.0 KB
mj_64.vp 12.4 KB
opencl-clang32.dll 59.1 MB
opencl-clang64.dll 79.6 MB
vp9e_32.vp 73.4 KB
vp9e_64.vp 13.1 KB
vpl_dispatcher_32.dll 441.6 KB
vpl_dispatcher_64.dll 508.9 KB
vulkan-1-32.dll 1.0 MB
vulkan-1-64.dll 1.2 MB
vulkaninfo-32.exe 1.4 MB
vulkaninfo-64.exe 1.8 MB
ze_intel_gpu64.dll 4.4 MB
ze_loader.dll 375.3 KB
ze_tracing_layer.dll 465.3 KB
ze_validation_layer.dll 147.3 KB
dg1_c_oprom.rom 1.0 MB
MiniCtaDriver.inf 4.2 KB
MiniCtaDriver.sys 37.6 KB
minictadriver.cat 48.2 KB
dg1_gfx_fwupdate.bin 2.0 MB
IntcDAud.inf 4.9 MB
IntcDAud.sys 304.5 KB
intcdaud.cat 51.0 KB
IntcDAud.inf 4.9 MB
IntcDAud.sys 360.5 KB
intcdaud.cat 51.5 KB
IntcDAud.inf 4.9 MB
IntcDAud.sys 343.0 KB
intcdaud.cat 51.4 KB
IntcDAud.inf 4.9 MB
IntcDAud.sys 643.5 KB
intcdaud.cat 54.0 KB
All versions of this driver
| Version | Release Date | Architecture | OS | |
|---|---|---|---|---|
| 31.0.101.1999 | 5/31/2022 | AMD64 | Windows 11 | 31.0.101.1999 |
| 30.0.101.1404 | 2/18/2022 | AMD64 | Windows 10 | (this page) |
| 30.0.101.1368 | 1/27/2022 | AMD64 | Windows 11, Windows 10 | 30.0.101.1368 |
| 27.20.100.8783 | 9/24/2020 | AMD64 | Windows 10 | 27.20.100.8783 |
| 27.20.100.8681 | 9/5/2020 | AMD64 | Windows 10 | 27.20.100.8681 |
| 27.20.100.8280 | 5/19/2020 | AMD64 | Windows 10 | 27.20.100.8280 |
| 26.20.100.7985 | 3/16/2020 | AMD64 | Windows 10 | 26.20.100.7985 |
| 26.20.100.7870 | 2/5/2020 | AMD64 | Windows 10 | 26.20.100.7870 |
Related drivers
- CometLake-U GT2 UHD Graphics (v31.0.101.2140)
- Alder Lake-S GT1 UHD Graphics 770 (v32.0.101.7080)
- Alder Lake-N UHD Graphics (v32.0.101.7077)
- TigerLake-LP GT2 Iris Xe Graphics (v32.0.101.7077)
- Alder Lake-S GT1 UHD Graphics 770 (v32.0.101.7077)
- Xeon E3-1200 v3 4th Gen Core Processor Integrated Graphics Controller (v20.19.15.4568)
- Alder Lake-S GT1 UHD Graphics 770 (v32.0.101.7077)
- TigerLake-LP GT2 Iris Xe Graphics (v32.0.101.7077)
- Alder Lake-S GT1 UHD Graphics 770 (v32.0.101.7026)
- Alder Lake-P GT1 UHD Graphics (v32.0.101.7077)
Sterowniki: Podstawa Stabilnej Pracy Urządzeń
Dlaczego Sterowniki są Tak Ważne?
Sterowniki odgrywają kluczową rolę w stabilności systemu. Przestarzałe lub uszkodzone sterowniki mogą powodować:
Zaleca się aktualizację sterowników co 3–6 miesięcy. Jest to szczególnie ważne przed instalacją nowego systemu operacyjnego, ponieważ zaktualizowane sterowniki mogą być niezbędne do zapewnienia kompatybilności.
Jak Utrzymać Sterowniki w Aktualności?
Automatyczna metoda aktualizacji i pobierania sterowników (Zalecane):
Jeśli nie chcesz ręcznie wyszukiwać odpowiedniego sterownika, dostępne są narzędzia, które automatycznie wykrywają model urządzenia i znajdują zgodny sterownik. Zmniejsza to ryzyko błędów i oszczędza czas.
Oferta specjalna
Pobierz

Limitations: trial version offers an unlimited number of scans, free driver backup and rollback. Registration for the full version starts from USD 29.95. See more information about Outbyte and uninstall instructions. Please review Outbyte EULA and Privacy Policy
Wszystkie linki zostały przeskanowane przez program antywirusowy.
Ręczna instalacja sterownika
Uwaga: Instalacja nieprawidłowej wersji sterownika może spowodować problemy z systemem. Jeśli nie jesteś pewien, który sterownik wybrać, zalecamy metodę automatyczną.
Pobierz sterownik za pomocą Menedżera urządzeń. Jak otworzyć Menedżera urządzeń:
Jak zainstalować sterowniki za pomocą Menedżera urządzeń:
How to Update a Driver for Free Using Outbyte Driver Updater
Utrzymywanie sterowników urządzeń na bieżąco pomaga zapewnić stabilną wydajność systemu Windows i prawidłowe działanie sprzętu. Poniżej znajduje się przewodnik krok po kroku wyjaśniający, jak bezpłatnie zaktualizować pojedynczy sterownik za pomocą Outbyte Driver Updater. Ten przewodnik opisuje metodę aktualizacji jednego wybranego sterownika bez aktywacji licencji i bez podawania jakichkolwiek danych osobowych lub informacji o płatności.
Czy możesz zaktualizować sterownik za darmo bez rejestracji?
Tak.
Outbyte Driver Updater pozwala na:
- bezpłatne skanowanie komputera w poszukiwaniu przestarzałych sterowników;
- przeglądanie listy wykrytych sterowników;
- bezpłatną aktualizację jednego wybranego sterownika;
- uniknięcie konieczności wprowadzania adresu e-mail, imienia, numeru karty kredytowej lub innych danych osobowych.
Proces bezpłatnej aktualizacji wymaga tylko zainstalowanego programu oraz standardowych kroków skanowania i aktualizacji.
Krok 1: Uruchom program i przeskanuj komputer
Pobierz i zainstaluj Outbyte Driver Updater na swoim komputerze z systemem Windows.
Po uruchomieniu programu automatycznie rozpocznie się skanowanie systemu i sprawdzanie zainstalowanych sterowników.
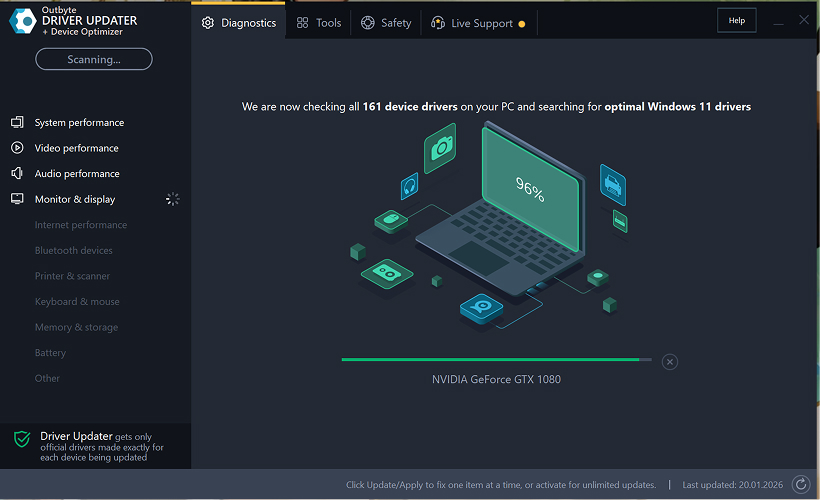
Krok 2: Zamknij okno aktywacji
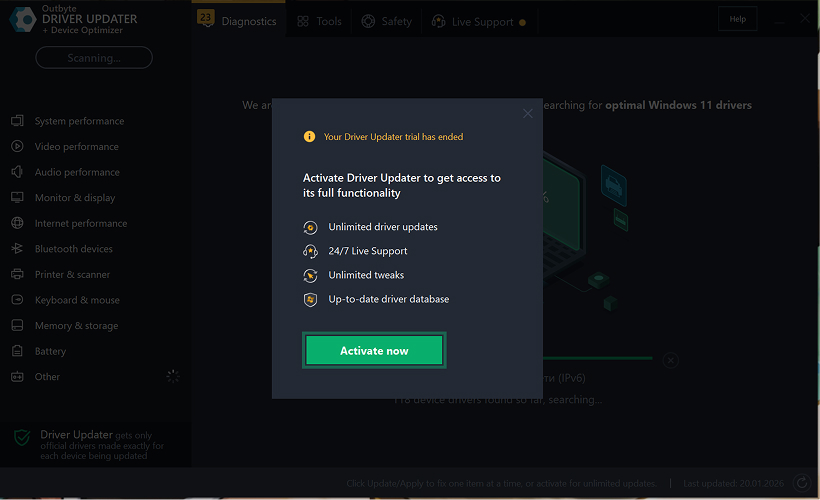
Po zakończeniu skanowania może pojawić się okno "Aktywuj teraz".
Aby kontynuować bezpłatnie:
- kliknij przycisk zamykania (X) w prawym górnym rogu okna.
Nie trzeba wprowadzać żadnych informacji
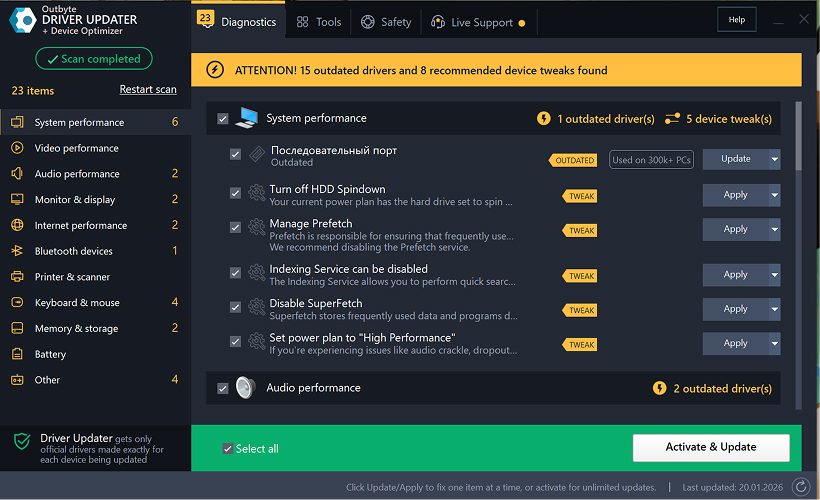
Krok 3: Wybierz kategorię sterownika
Z menu po lewej stronie wybierz kategorię urządzenia, które chcesz zaktualizować, na przykład:
- sterowniki audio;
- sterowniki wideo i grafiki;
- sterowniki sieciowe i Wi-Fi;
- sterowniki Bluetooth;
- sterowniki drukarek i skanerów.
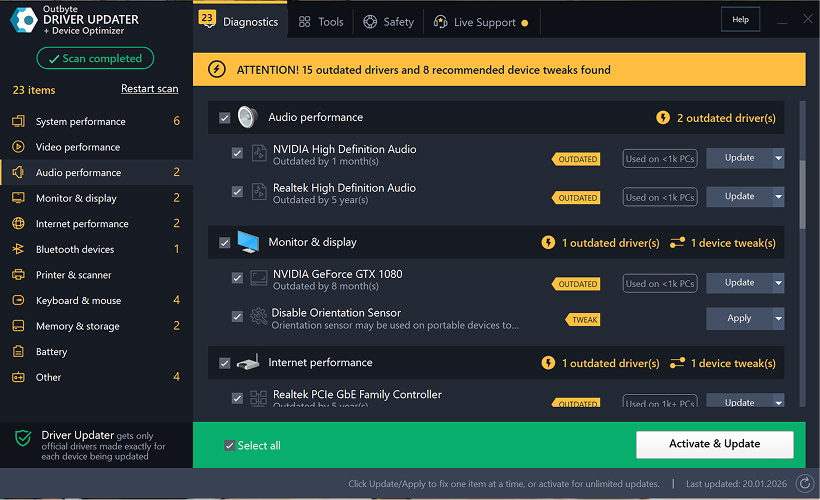
Krok 4: Kliknij "Aktualizuj" obok wybranego sterownika
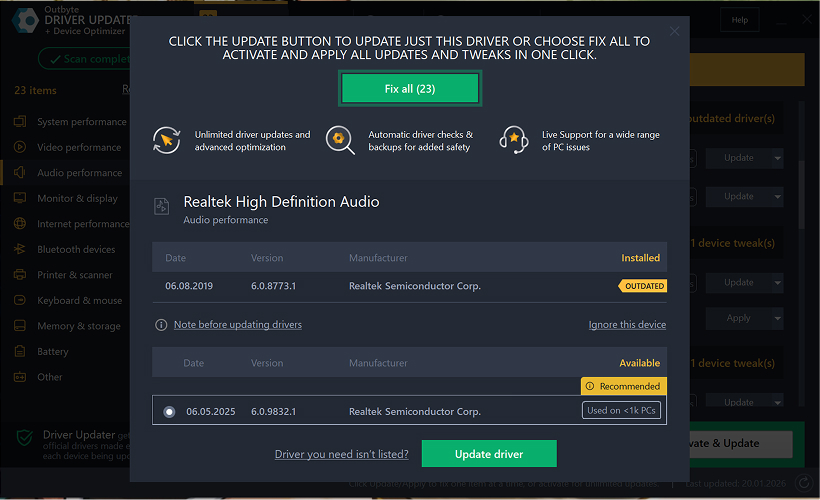
Na liście sterowników znajdź sterownik, który chcesz zaktualizować i kliknij przycisk Aktualizuj obok niego.
Krok 5: Potwierdź aktualizację sterownika
W wyskakującym oknie kliknij Aktualizuj sterownik.
Na tym etapie nie są wymagane żadne dane osobowe ani informacje o płatności.
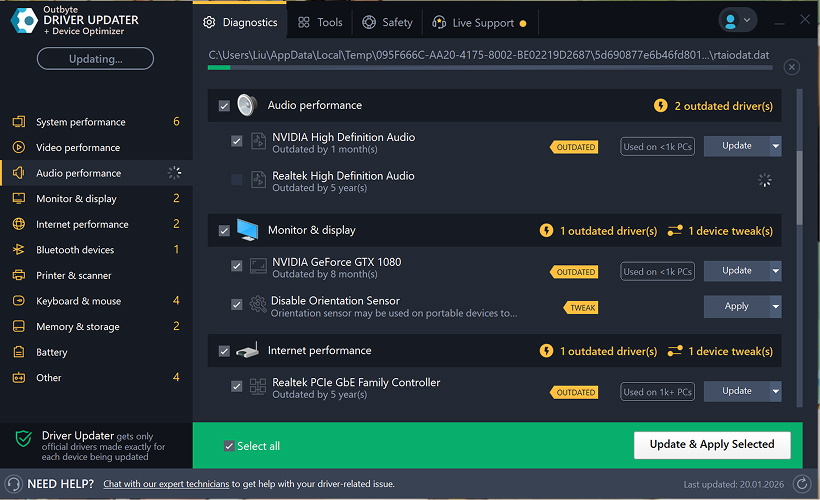
Krok 6: Poczekaj na zakończenie procesu aktualizacji
Program rozpocznie pobieranie i instalację wybranego sterownika.
Poczekaj, aż proces zostanie zakończony.
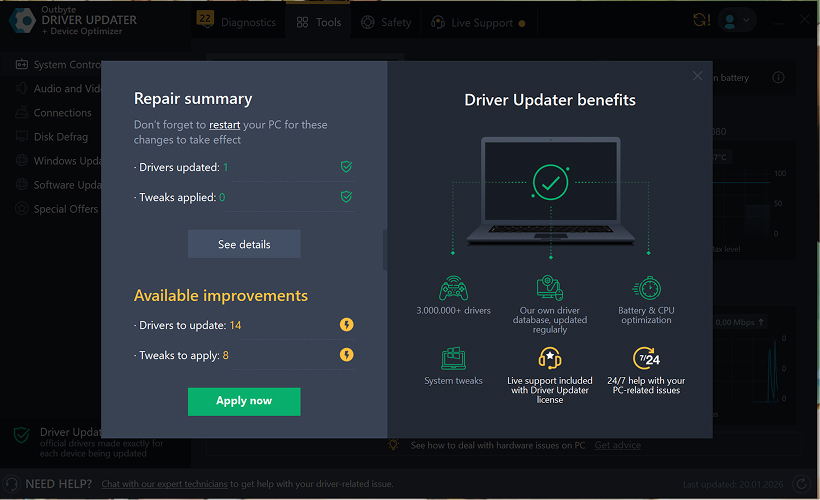
Krok 7: Zastosuj zmiany i uruchom ponownie komputer
Po zakończeniu instalacji kliknij Zastosuj teraz, aby zastosować zmiany.
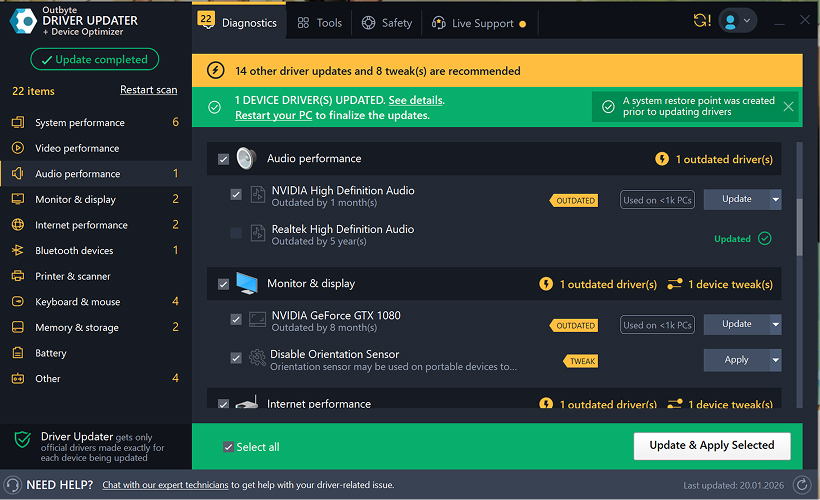
Aby upewnić się, że zaktualizowany sterownik działa poprawnie, uruchom ponownie komputer.
Ważne uwagi
- Bezpłatne aktualizacje są dostępne po jednym sterowniku na raz.
- Do bezpłatnej aktualizacji nie jest wymagana rejestracja.
- Nie są wymagane informacje o karcie kredytowej ani płatności.
- Wszystkie działania są wykonywane lokalnie w programie po przeskanowaniu systemu.
- Dostępność bezpłatnej aktualizacji może zależeć od typu sterownika i konfiguracji systemu.
Learn to pair your wireless mouse with a different USB receiver in simple steps. Check compatibility (e.g., Logitech Unifying receivers), install required software/drivers, and use pairing modes to sync devices. Troubleshoot connection issues and optimize performance for seamless use.
Simplify your workspace with Logitech Unifying Software, enabling effortless connection of up to six compatible devices through a single receiver. Enjoy quick setup, clutter-free connectivity, and enhanced productivity as your keyboard, mouse, and other peripherals work in perfect harmony.
Learn how to set up your Epson L3250 printer with this step-by-step guide. Unbox, install ink, connect to power, and download drivers via Epson’s website or included CD. Configure Wi-Fi settings for wireless printing and run a test page to ensure proper installation. Simplify your setup process and start printing effortlessly.
Transform your smartphone into an HD webcam with DroidCam. Enjoy wireless connectivity and seamless video streaming for crystal-clear video calls, live streams, or online meetings. Works with PC/Mac.
Learn how to enable Bluetooth on your PC in a few simple steps. Check compatibility, activate Bluetooth via Windows Settings or the system tray, pair your device, and troubleshoot common issues. This guide ensures seamless wireless connections for headphones, speakers, or peripherals.
Learn how to set up your Epson L3250 printer quickly and efficiently. This guide covers unboxing, installing ink cartridges, connecting to power, and configuring Wi-Fi for seamless wireless printing. Follow step-by-step instructions to install drivers, align the printer head, and troubleshoot common issues. Perfect for home or office use, the Epson L3250 ensures hassle-free installation and high-quality printing, scanning, and copying.
Download the latest Epson L3250 printer drivers and software to ensure seamless connectivity and optimal performance. Compatible with Windows and macOS, these tools enable easy setup, wireless printing, and advanced features. Visit the official Epson support page for secure, up-to-date downloads tailored to your operating system. Simplify installation and maximize your printer’s capabilities with reliable drivers and utilities.
Discover innovative strategies to amplify your message and connect deeply with audiences – no microphone needed. Harness the power of body language, visual storytelling, and creative platforms to make your voice heard in any setting.
The Valeton GP 100 Wah is a professional-grade guitar pedal designed for musicians seeking dynamic sound control and expressive tonal shaping. Featuring a responsive wah circuit, it delivers smooth, vintage-inspired sweeps and modern versatility for rock, funk, blues, and beyond. Built with durable components and an intuitive design, the GP 100 ensures reliable performance on stage or in the studio. Adjustable parameters and a true bypass switch provide seamless integration into any pedalboard setup, while its compact size maximizes space efficiency. Elevate your playing with rich, articulate wah effects tailored to your musical style.
Virtual CloneDrive offers effortless disc image mounting and virtual drive cloning, enabling you to access ISO, BIN, IMG, and other formats without physical media. Streamline workflows, run software, or backup data with a lightweight, user-friendly tool that integrates seamlessly into your system. Simplify disc management and enhance productivity—no hardware required.