Güvenilir Yazılım

Outbyte Driver Updater
- 1.000.000+ sürücü
- Yüklendi: 1,143,473 kez
- Windows 11 / 10 / 8 / 7





 İndirmek
AR9485 Wireless Network Adapter
İndirmek
AR9485 Wireless Network Adapter
İndirmek
AR9485 Wireless Network Adapter

Sistem Bilgileri
Bilgisayarınız şu anda aşağıdaki sistemde çalışıyor:
Driver details
Driver Name:
AR9485 Wireless Network Adapter
Provider:
Qualcomm Atheros Communications Inc.
Version:
10.0.0.340
Release Date:
5/3/2016
Architecture:
X86
File Size:
880 KB
Driver ID:
pci\ven_168c&dev_0032&subsys_850d1043
Supported OS:
Windows 10
WHQL:
Signed
Özel teklif
İndirmek
Tüm bağlantılar antivirüs programı tarafından taranmıştır.
Manual download (.cab, 880 KB) from Microsoft servers
— install via Device Manager.
Compatible hardware
- AR9485 Wireless Network Adapter (Qualcomm Atheros)
- AR9462 Wireless Network Adapter (Qualcomm Atheros)
- QCA9565 / AR9565 Wireless Network Adapter (Qualcomm Atheros)
- AR928X Wireless Network Adapter (PCI-Express) (Qualcomm Atheros)
- AR5418 Wireless Network Adapter [AR5008E 802.11(a)bgn] (PCI-Express) (Qualcomm Atheros)
- AR5416 Wireless Network Adapter [AR5008 802.11(a)bgn] (Qualcomm Atheros)
- AR5212/5213/2414 Wireless Network Adapter (Qualcomm Atheros)
- AR5413/AR5414 Wireless Network Adapter [AR5006X(S) 802.11abg] (Qualcomm Atheros)
- AR242x / AR542x Wireless Network Adapter (PCI-Express) (Qualcomm Atheros)
- AR9285 Wireless Network Adapter (PCI-Express) (Qualcomm Atheros)
- AR9287 Wireless Network Adapter (PCI-Express) (Qualcomm Atheros)
- AR93xx Wireless Network Adapter (Qualcomm Atheros)
- AR922X Wireless Network Adapter (Qualcomm Atheros)
- AR9227 Wireless Network Adapter (Qualcomm Atheros)
- AR2413/AR2414 Wireless Network Adapter [AR5005G(S) 802.11bg] (Qualcomm Atheros)
Supported Hardware IDs
pci\ven_168c&dev_0013&subsys_00171737
pci\ven_168c&dev_0013&subsys_00251737
pci\ven_168c&dev_0013&subsys_00351731
pci\ven_168c&dev_0013&subsys_00351737
pci\ven_168c&dev_0013&subsys_00361737
pci\ven_168c&dev_0013&subsys_04061468
pci\ven_168c&dev_0013&subsys_04071468
pci\ven_168c&dev_0013&subsys_04081468
pci\ven_168c&dev_0013&subsys_04171468
pci\ven_168c&dev_0013&subsys_1012185f
Show all 726 hardware IDs
pci\ven_168c&dev_0013&subsys_1025168c
pci\ven_168c&dev_0013&subsys_1026168c
pci\ven_168c&dev_0013&subsys_1030168c
pci\ven_168c&dev_0013&subsys_1031168c
pci\ven_168c&dev_0013&subsys_1041168c
pci\ven_168c&dev_0013&subsys_1042168c
pci\ven_168c&dev_0013&subsys_1051168c
pci\ven_168c&dev_0013&subsys_1053168c
pci\ven_168c&dev_0013&subsys_12031259
pci\ven_168c&dev_0013&subsys_12041259
pci\ven_168c&dev_0013&subsys_123410cf
pci\ven_168c&dev_0013&subsys_123510cf
pci\ven_168c&dev_0013&subsys_123610cf
pci\ven_168c&dev_0013&subsys_2026168c
pci\ven_168c&dev_0013&subsys_2030168c
pci\ven_168c&dev_0013&subsys_2031168c
pci\ven_168c&dev_0013&subsys_2041168c
pci\ven_168c&dev_0013&subsys_2042168c
pci\ven_168c&dev_0013&subsys_2051168c
pci\ven_168c&dev_0013&subsys_2053168c
pci\ven_168c&dev_0013&subsys_30001799
pci\ven_168c&dev_0013&subsys_307002fa
pci\ven_168c&dev_0013&subsys_32021186
pci\ven_168c&dev_0013&subsys_32031186
pci\ven_168c&dev_0013&subsys_3a071186
pci\ven_168c&dev_0013&subsys_3a081186
pci\ven_168c&dev_0013&subsys_3a121186
pci\ven_168c&dev_0013&subsys_3a131186
pci\ven_168c&dev_0013&subsys_3a141186
pci\ven_168c&dev_0013&subsys_3a171186
pci\ven_168c&dev_0013&subsys_3a181186
pci\ven_168c&dev_0013&subsys_3a1a1186
pci\ven_168c&dev_0013&subsys_3a1b1186
pci\ven_168c&dev_0013&subsys_3a1c1186
pci\ven_168c&dev_0013&subsys_3a631186
pci\ven_168c&dev_0013&subsys_3a731186
pci\ven_168c&dev_0013&subsys_3a741186
pci\ven_168c&dev_0013&subsys_3b081186
pci\ven_168c&dev_0013&subsys_46101385
pci\ven_168c&dev_0013&subsys_4b001385
pci\ven_168c&dev_0013&subsys_4d001385
pci\ven_168c&dev_0013&subsys_4f001385
pci\ven_168c&dev_0013&subsys_5a001385
pci\ven_168c&dev_0013&subsys_5b001385
pci\ven_168c&dev_0013&subsys_5d001385
pci\ven_168c&dev_0013&subsys_5e001385
pci\ven_168c&dev_0013&subsys_7064144f
pci\ven_168c&dev_0013&subsys_7065144f
pci\ven_168c&dev_0013&subsys_7084144f
pci\ven_168c&dev_0013&subsys_7088144f
pci\ven_168c&dev_0013&subsys_a527167d
pci\ven_168c&dev_0013&subsys_e8011458
pci\ven_168c&dev_0013&subsys_e8111458
pci\ven_168c&dev_0013&subsys_e8141458
pci\ven_168c&dev_0013&subsys_e9011458
pci\ven_168c&dev_0013&subsys_e9111458
pci\ven_168c&dev_0013&subsys_e9121458
pci\ven_168c&dev_001a&subsys_00531737
pci\ven_168c&dev_001a&subsys_04181468
pci\ven_168c&dev_001a&subsys_04201468
pci\ven_168c&dev_001a&subsys_04261468
pci\ven_168c&dev_001a&subsys_1052168c
pci\ven_168c&dev_001a&subsys_1054168c
pci\ven_168c&dev_001a&subsys_2052168c
pci\ven_168c&dev_001a&subsys_2054168c
pci\ven_168c&dev_001a&subsys_307102fa
pci\ven_168c&dev_001a&subsys_3a151186
pci\ven_168c&dev_001a&subsys_3a161186
pci\ven_168c&dev_001a&subsys_3a1c1186
pci\ven_168c&dev_001a&subsys_3a1d1186
pci\ven_168c&dev_001a&subsys_3a231186
pci\ven_168c&dev_001a&subsys_3a241186
pci\ven_168c&dev_001a&subsys_3b081186
pci\ven_168c&dev_001a&subsys_700d1799
pci\ven_168c&dev_001a&subsys_701d1799
pci\ven_168c&dev_001a&subsys_7094144f
pci\ven_168c&dev_001a&subsys_7101144f
pci\ven_168c&dev_001a&subsys_7114144f
pci\ven_168c&dev_001a&subsys_7115144f
pci\ven_168c&dev_001b&subsys_00431737
pci\ven_168c&dev_001b&subsys_00441737
pci\ven_168c&dev_001b&subsys_1061168c
pci\ven_168c&dev_001b&subsys_1062168c
pci\ven_168c&dev_001b&subsys_1063168c
pci\ven_168c&dev_001b&subsys_1065168c
pci\ven_168c&dev_001b&subsys_132910cf
pci\ven_168c&dev_001b&subsys_134f10cf
pci\ven_168c&dev_001b&subsys_1602196f
pci\ven_168c&dev_001b&subsys_1603196f
pci\ven_168c&dev_001b&subsys_2061168c
pci\ven_168c&dev_001b&subsys_2062168c
pci\ven_168c&dev_001b&subsys_2063168c
pci\ven_168c&dev_001b&subsys_2065168c
pci\ven_168c&dev_001b&subsys_30001799
pci\ven_168c&dev_001b&subsys_3a191186
pci\ven_168c&dev_001b&subsys_3a221186
pci\ven_168c&dev_001b&subsys_500011ad
pci\ven_168c&dev_001b&subsys_500111ad
pci\ven_168c&dev_001b&subsys_530111ad
pci\ven_168c&dev_001b&subsys_540111ad
pci\ven_168c&dev_001b&subsys_7092144f
pci\ven_168c&dev_001b&subsys_e9011458
pci\ven_168c&dev_001c&subsys_0034168c
pci\ven_168c&dev_001c&subsys_0035168c
pci\ven_168c&dev_001c&subsys_01001a32
pci\ven_168c&dev_001c&subsys_01051a32
pci\ven_168c&dev_001c&subsys_01081a32
pci\ven_168c&dev_001c&subsys_01121a32
pci\ven_168c&dev_001c&subsys_02001a32
pci\ven_168c&dev_001c&subsys_0202168c
pci\ven_168c&dev_001c&subsys_02b01028
pci\ven_168c&dev_001c&subsys_02b11028
pci\ven_168c&dev_001c&subsys_02d61028
pci\ven_168c&dev_001c&subsys_04221468
pci\ven_168c&dev_001c&subsys_04231468
pci\ven_168c&dev_001c&subsys_0423168c
pci\ven_168c&dev_001c&subsys_04251468
pci\ven_168c&dev_001c&subsys_04271468
pci\ven_168c&dev_001c&subsys_04281468
pci\ven_168c&dev_001c&subsys_042a1468
pci\ven_168c&dev_001c&subsys_102010e9
pci\ven_168c&dev_001c&subsys_102510e9
pci\ven_168c&dev_001c&subsys_10261a3b
pci\ven_168c&dev_001c&subsys_10331a3b
pci\ven_168c&dev_001c&subsys_10341a3b
pci\ven_168c&dev_001c&subsys_10601a3b
pci\ven_168c&dev_001c&subsys_137a103c
pci\ven_168c&dev_001c&subsys_137b103c
pci\ven_168c&dev_001c&subsys_1385103c
pci\ven_168c&dev_001c&subsys_1386103c
pci\ven_168c&dev_001c&subsys_139c10cf
pci\ven_168c&dev_001c&subsys_142e10cf
pci\ven_168c&dev_001c&subsys_1604196f
pci\ven_168c&dev_001c&subsys_21081a32
pci\ven_168c&dev_001c&subsys_2a97103c
pci\ven_168c&dev_001c&subsys_303f103c
pci\ven_168c&dev_001c&subsys_3040103c
pci\ven_168c&dev_001c&subsys_3061168c
pci\ven_168c&dev_001c&subsys_3062168c
pci\ven_168c&dev_001c&subsys_3063168c
pci\ven_168c&dev_001c&subsys_3064168c
pci\ven_168c&dev_001c&subsys_3065168c
pci\ven_168c&dev_001c&subsys_3067168c
pci\ven_168c&dev_001c&subsys_316417aa
pci\ven_168c&dev_001c&subsys_41051a32
pci\ven_168c&dev_001c&subsys_630311ad
pci\ven_168c&dev_001c&subsys_631311ad
pci\ven_168c&dev_001c&subsys_632311ad
pci\ven_168c&dev_001c&subsys_633311ad
pci\ven_168c&dev_001c&subsys_635311ad
pci\ven_168c&dev_001c&subsys_660311ad
pci\ven_168c&dev_001c&subsys_7096144f
pci\ven_168c&dev_001c&subsys_7106144f
pci\ven_168c&dev_001c&subsys_7108144f
pci\ven_168c&dev_001c&subsys_7111144f
pci\ven_168c&dev_001c&subsys_7112144f
pci\ven_168c&dev_001c&subsys_7116144f
pci\ven_168c&dev_001c&subsys_7128144f
pci\ven_168c&dev_001c&subsys_7130144f
pci\ven_168c&dev_001c&subsys_7131144f
pci\ven_168c&dev_001c&subsys_75191113
pci\ven_168c&dev_001c&subsys_a6011113
pci\ven_168c&dev_001c&subsys_c6011113
pci\ven_168c&dev_001c&subsys_e000105b
pci\ven_168c&dev_001c&subsys_e002105b
pci\ven_168c&dev_001c&subsys_e008105b
pci\ven_168c&dev_001c&subsys_e00b105b
pci\ven_168c&dev_001c&subsys_e00c105b
pci\ven_168c&dev_001c&subsys_e00d105b
pci\ven_168c&dev_001c&subsys_e00e105b
pci\ven_168c&dev_001c&subsys_e9131458
pci\ven_168c&dev_001c&subsys_e9171458
pci\ven_168c&dev_001c&subsys_e9181458
pci\ven_168c&dev_001d&subsys_1055168c
pci\ven_168c&dev_001d&subsys_2055168c
pci\ven_168c&dev_001d&subsys_720b1799
pci\ven_168c&dev_001d&subsys_b2031113
pci\ven_168c&dev_0023&subsys_1071168c
pci\ven_168c&dev_0023&subsys_1072168c
pci\ven_168c&dev_0023&subsys_147e10cf
pci\ven_168c&dev_0023&subsys_2071168c
pci\ven_168c&dev_0023&subsys_2072168c
pci\ven_168c&dev_0023&subsys_3a0907d1
pci\ven_168c&dev_0023&subsys_3a691186
pci\ven_168c&dev_0023&subsys_3a6a1186
pci\ven_168c&dev_0023&subsys_3a6b1186
pci\ven_168c&dev_0023&subsys_3a6d1186
pci\ven_168c&dev_0023&subsys_3a6e1186
pci\ven_168c&dev_0023&subsys_3a761186
pci\ven_168c&dev_0023&subsys_800118cb
pci\ven_168c&dev_0023&subsys_80111799
pci\ven_168c&dev_0023&subsys_e9141458
pci\ven_168c&dev_0024&subsys_0032168c
pci\ven_168c&dev_0024&subsys_0033168c
pci\ven_168c&dev_0024&subsys_03841014
pci\ven_168c&dev_0024&subsys_04291468
pci\ven_168c&dev_0024&subsys_04301468
pci\ven_168c&dev_0024&subsys_05021a32
pci\ven_168c&dev_0024&subsys_102210e9
pci\ven_168c&dev_0024&subsys_10241a3b
pci\ven_168c&dev_0024&subsys_102610e9
pci\ven_168c&dev_0024&subsys_13c010cf
pci\ven_168c&dev_0024&subsys_2072144f
pci\ven_168c&dev_0024&subsys_2a5f103c
pci\ven_168c&dev_0024&subsys_3072168c
pci\ven_168c&dev_0024&subsys_3a6f1186
pci\ven_168c&dev_0024&subsys_3a701186
pci\ven_168c&dev_0024&subsys_7122144f
pci\ven_168c&dev_0024&subsys_7125144f
pci\ven_168c&dev_0024&subsys_7132144f
pci\ven_168c&dev_0024&subsys_90001385
pci\ven_168c&dev_0024&subsys_e8151458
pci\ven_168c&dev_0024&subsys_e9151458
pci\ven_168c&dev_0024&subsys_e9161458
pci\ven_168c&dev_0029&subsys_2091168c
pci\ven_168c&dev_0029&subsys_2092168c
pci\ven_168c&dev_0029&subsys_2093168c
pci\ven_168c&dev_0029&subsys_2094168c
pci\ven_168c&dev_0029&subsys_2096168c
pci\ven_168c&dev_0029&subsys_2098168c
pci\ven_168c&dev_0029&subsys_3a781186
pci\ven_168c&dev_0029&subsys_3a791186
pci\ven_168c&dev_0029&subsys_3a7a1186
pci\ven_168c&dev_0029&subsys_3a7b1186
pci\ven_168c&dev_0029&subsys_92231ace
pci\ven_168c&dev_0029&subsys_d05b10fc
pci\ven_168c&dev_002a&subsys_00341b0a
pci\ven_168c&dev_002a&subsys_0036168c
pci\ven_168c&dev_002a&subsys_008f106b
pci\ven_168c&dev_002a&subsys_03011a32
pci\ven_168c&dev_002a&subsys_03031a32
pci\ven_168c&dev_002a&subsys_03061a32
pci\ven_168c&dev_002a&subsys_05041a32
pci\ven_168c&dev_002a&subsys_05071a32
pci\ven_168c&dev_002a&subsys_1000168c
pci\ven_168c&dev_002a&subsys_1001168c
pci\ven_168c&dev_002a&subsys_10671a3b
pci\ven_168c&dev_002a&subsys_10711a3b
pci\ven_168c&dev_002a&subsys_10811a3b
pci\ven_168c&dev_002a&subsys_10901a3b
pci\ven_168c&dev_002a&subsys_1130168c
pci\ven_168c&dev_002a&subsys_1381103c
pci\ven_168c&dev_002a&subsys_1382103c
pci\ven_168c&dev_002a&subsys_147c10cf
pci\ven_168c&dev_002a&subsys_147d10cf
pci\ven_168c&dev_002a&subsys_153610cf
pci\ven_168c&dev_002a&subsys_1a671a3b
pci\ven_168c&dev_002a&subsys_1c711a3b
pci\ven_168c&dev_002a&subsys_20001071
pci\ven_168c&dev_002a&subsys_3041103c
pci\ven_168c&dev_002a&subsys_3042103c
pci\ven_168c&dev_002a&subsys_3091168c
pci\ven_168c&dev_002a&subsys_3092168c
pci\ven_168c&dev_002a&subsys_3093168c
pci\ven_168c&dev_002a&subsys_3094168c
pci\ven_168c&dev_002a&subsys_3095168c
pci\ven_168c&dev_002a&subsys_3096168c
pci\ven_168c&dev_002a&subsys_3097168c
pci\ven_168c&dev_002a&subsys_3098168c
pci\ven_168c&dev_002a&subsys_3099168c
pci\ven_168c&dev_002a&subsys_309917aa
pci\ven_168c&dev_002a&subsys_309a168c
pci\ven_168c&dev_002a&subsys_309b168c
pci\ven_168c&dev_002a&subsys_309c168c
pci\ven_168c&dev_002a&subsys_309d168c
pci\ven_168c&dev_002a&subsys_309d17aa
pci\ven_168c&dev_002a&subsys_309d185f
pci\ven_168c&dev_002a&subsys_309f168c
pci\ven_168c&dev_002a&subsys_30a3168c
pci\ven_168c&dev_002a&subsys_43011a32
pci\ven_168c&dev_002a&subsys_43031a32
pci\ven_168c&dev_002a&subsys_43061a32
pci\ven_168c&dev_002a&subsys_45071a32
pci\ven_168c&dev_002a&subsys_650211ad
pci\ven_168c&dev_002a&subsys_65071a32
pci\ven_168c&dev_002a&subsys_651211ad
pci\ven_168c&dev_002a&subsys_652211ad
pci\ven_168c&dev_002a&subsys_653211ad
pci\ven_168c&dev_002a&subsys_654211ad
pci\ven_168c&dev_002a&subsys_655211ad
pci\ven_168c&dev_002a&subsys_660011ad
pci\ven_168c&dev_002a&subsys_661011ad
pci\ven_168c&dev_002a&subsys_661211ad
pci\ven_168c&dev_002a&subsys_662011ad
pci\ven_168c&dev_002a&subsys_662211ad
pci\ven_168c&dev_002a&subsys_663211ad
pci\ven_168c&dev_002a&subsys_664211ad
pci\ven_168c&dev_002a&subsys_7136144f
pci\ven_168c&dev_002a&subsys_7137144f
pci\ven_168c&dev_002a&subsys_7138144f
pci\ven_168c&dev_002a&subsys_7139144f
pci\ven_168c&dev_002a&subsys_7140144f
pci\ven_168c&dev_002a&subsys_7141144f
pci\ven_168c&dev_002a&subsys_7154144f
pci\ven_168c&dev_002a&subsys_7156144f
pci\ven_168c&dev_002a&subsys_7157144f
pci\ven_168c&dev_002a&subsys_7158144f
pci\ven_168c&dev_002a&subsys_7161144f
pci\ven_168c&dev_002a&subsys_7163144f
pci\ven_168c&dev_002a&subsys_7168144f
pci\ven_168c&dev_002a&subsys_a8221113
pci\ven_168c&dev_002a&subsys_b8221113
pci\ven_168c&dev_002a&subsys_c8221113
pci\ven_168c&dev_002a&subsys_c8231113
pci\ven_168c&dev_002a&subsys_d6221113
pci\ven_168c&dev_002a&subsys_d8221113
pci\ven_168c&dev_002a&subsys_e004105b
pci\ven_168c&dev_002a&subsys_e006105b
pci\ven_168c&dev_002a&subsys_e007105b
pci\ven_168c&dev_002a&subsys_e009105b
pci\ven_168c&dev_002a&subsys_e00f105b
pci\ven_168c&dev_002a&subsys_e010105b
pci\ven_168c&dev_002a&subsys_e012105b
pci\ven_168c&dev_002a&subsys_e013105b
pci\ven_168c&dev_002a&subsys_e015105b
pci\ven_168c&dev_002a&subsys_e019105b
pci\ven_168c&dev_002a&subsys_e01f105b
pci\ven_168c&dev_002a&subsys_e6221113
pci\ven_168c&dev_002a&subsys_e9191458
pci\ven_168c&dev_002a&subsys_f8221113
pci\ven_168c&dev_002b&subsys_00231931
pci\ven_168c&dev_002b&subsys_0037168c
pci\ven_168c&dev_002b&subsys_0204168c
pci\ven_168c&dev_002b&subsys_0205168c
pci\ven_168c&dev_002b&subsys_03051a32
pci\ven_168c&dev_002b&subsys_04001b9a
pci\ven_168c&dev_002b&subsys_04011b9a
pci\ven_168c&dev_002b&subsys_04021b9a
pci\ven_168c&dev_002b&subsys_04031b9a
pci\ven_168c&dev_002b&subsys_04101b9a
pci\ven_168c&dev_002b&subsys_04111b9a
pci\ven_168c&dev_002b&subsys_04641028
pci\ven_168c&dev_002b&subsys_0c001b9a
pci\ven_168c&dev_002b&subsys_0c011b9a
pci\ven_168c&dev_002b&subsys_0c021b9a
pci\ven_168c&dev_002b&subsys_0c031b9a
pci\ven_168c&dev_002b&subsys_0c041b9a
pci\ven_168c&dev_002b&subsys_0c051b9a
pci\ven_168c&dev_002b&subsys_0c101b9a
pci\ven_168c&dev_002b&subsys_0c111b9a
pci\ven_168c&dev_002b&subsys_10001b14
pci\ven_168c&dev_002b&subsys_10891a3b
pci\ven_168c&dev_002b&subsys_11061a3b
pci\ven_168c&dev_002b&subsys_1461103c
pci\ven_168c&dev_002b&subsys_153710cf
pci\ven_168c&dev_002b&subsys_161910cf
pci\ven_168c&dev_002b&subsys_1a891a3b
pci\ven_168c&dev_002b&subsys_1d891a3b
pci\ven_168c&dev_002b&subsys_20361a3b
pci\ven_168c&dev_002b&subsys_23001a32
pci\ven_168c&dev_002b&subsys_23051a32
pci\ven_168c&dev_002b&subsys_2a371a3b
pci\ven_168c&dev_002b&subsys_2c371a3b
pci\ven_168c&dev_002b&subsys_303f103c
pci\ven_168c&dev_002b&subsys_3040103c
pci\ven_168c&dev_002b&subsys_30a1168c
pci\ven_168c&dev_002b&subsys_30a117aa
pci\ven_168c&dev_002b&subsys_30a1185f
pci\ven_168c&dev_002b&subsys_30a11895
pci\ven_168c&dev_002b&subsys_30a2168c
pci\ven_168c&dev_002b&subsys_30ab168c
pci\ven_168c&dev_002b&subsys_30ab185f
pci\ven_168c&dev_002b&subsys_30ab1895
pci\ven_168c&dev_002b&subsys_30ad168c
pci\ven_168c&dev_002b&subsys_30ae168c
pci\ven_168c&dev_002b&subsys_30ae185f
pci\ven_168c&dev_002b&subsys_30af168c
pci\ven_168c&dev_002b&subsys_30af185f
pci\ven_168c&dev_002b&subsys_30b2185f
pci\ven_168c&dev_002b&subsys_31a117aa
pci\ven_168c&dev_002b&subsys_3b001106
pci\ven_168c&dev_002b&subsys_4101144d
pci\ven_168c&dev_002b&subsys_4102144d
pci\ven_168c&dev_002b&subsys_4103144d
pci\ven_168c&dev_002b&subsys_4104144d
pci\ven_168c&dev_002b&subsys_4114144d
pci\ven_168c&dev_002b&subsys_43051a32
pci\ven_168c&dev_002b&subsys_63051a32
pci\ven_168c&dev_002b&subsys_660111ad
pci\ven_168c&dev_002b&subsys_660311ad
pci\ven_168c&dev_002b&subsys_661111ad
pci\ven_168c&dev_002b&subsys_661311ad
pci\ven_168c&dev_002b&subsys_662111ad
pci\ven_168c&dev_002b&subsys_662311ad
pci\ven_168c&dev_002b&subsys_663111ad
pci\ven_168c&dev_002b&subsys_664111ad
pci\ven_168c&dev_002b&subsys_665111ad
pci\ven_168c&dev_002b&subsys_666111ad
pci\ven_168c&dev_002b&subsys_7159144f
pci\ven_168c&dev_002b&subsys_7164144f
pci\ven_168c&dev_002b&subsys_7167144f
pci\ven_168c&dev_002b&subsys_7173144f
pci\ven_168c&dev_002b&subsys_7178144f
pci\ven_168c&dev_002b&subsys_7182144f
pci\ven_168c&dev_002b&subsys_7183144f
pci\ven_168c&dev_002b&subsys_7187144f
pci\ven_168c&dev_002b&subsys_7194144f
pci\ven_168c&dev_002b&subsys_83051a32
pci\ven_168c&dev_002b&subsys_98111113
pci\ven_168c&dev_002b&subsys_a0111113
pci\ven_168c&dev_002b&subsys_a3051a32
pci\ven_168c&dev_002b&subsys_a5003485
pci\ven_168c&dev_002b&subsys_a5013485
pci\ven_168c&dev_002b&subsys_a5023485
pci\ven_168c&dev_002b&subsys_a8311113
pci\ven_168c&dev_002b&subsys_a8411113
pci\ven_168c&dev_002b&subsys_a8421113
pci\ven_168c&dev_002b&subsys_ba91167d
pci\ven_168c&dev_002b&subsys_d8111113
pci\ven_168c&dev_002b&subsys_e014105b
pci\ven_168c&dev_002b&subsys_e016105b
pci\ven_168c&dev_002b&subsys_e017105b
pci\ven_168c&dev_002b&subsys_e01a105b
pci\ven_168c&dev_002b&subsys_e022105b
pci\ven_168c&dev_002b&subsys_e023105b
pci\ven_168c&dev_002b&subsys_e025105b
pci\ven_168c&dev_002b&subsys_e031105b
pci\ven_168c&dev_002b&subsys_e032105b
pci\ven_168c&dev_002b&subsys_e033105b
pci\ven_168c&dev_002b&subsys_e035105b
pci\ven_168c&dev_002b&subsys_e036105b
pci\ven_168c&dev_002b&subsys_e037105b
pci\ven_168c&dev_002b&subsys_e03e105b
pci\ven_168c&dev_002b&subsys_e048105b
pci\ven_168c&dev_002b&subsys_e049105b
pci\ven_168c&dev_002b&subsys_e070105b
pci\ven_168c&dev_002b&subsys_e6111113
pci\ven_168c&dev_002b&subsys_e8111113
pci\ven_168c&dev_002b&subsys_ee321113
pci\ven_168c&dev_002b&subsys_f6111113
pci\ven_168c&dev_002c&subsys_1029105b
pci\ven_168c&dev_002c&subsys_11121a3b
pci\ven_168c&dev_002c&subsys_1a121a3b
pci\ven_168c&dev_002c&subsys_30a7168c
pci\ven_168c&dev_002c&subsys_e029105b
pci\ven_168c&dev_002d&subsys_0300168c
pci\ven_168c&dev_002d&subsys_0301168c
pci\ven_168c&dev_002d&subsys_2099168c
pci\ven_168c&dev_002e&subsys_03091a32
pci\ven_168c&dev_002e&subsys_08001b9a
pci\ven_168c&dev_002e&subsys_08011b9a
pci\ven_168c&dev_002e&subsys_08021b9a
pci\ven_168c&dev_002e&subsys_11211a3b
pci\ven_168c&dev_002e&subsys_1462103c
pci\ven_168c&dev_002e&subsys_158f10cf
pci\ven_168c&dev_002e&subsys_1626103c
pci\ven_168c&dev_002e&subsys_1a211a3b
pci\ven_168c&dev_002e&subsys_23091a32
pci\ven_168c&dev_002e&subsys_30a4168c
pci\ven_168c&dev_002e&subsys_30a417aa
pci\ven_168c&dev_002e&subsys_30b0168c
pci\ven_168c&dev_002e&subsys_30b3185f
pci\ven_168c&dev_002e&subsys_30b4185f
pci\ven_168c&dev_002e&subsys_31a417aa
pci\ven_168c&dev_002e&subsys_43091a32
pci\ven_168c&dev_002e&subsys_660311ad
pci\ven_168c&dev_002e&subsys_660711ad
pci\ven_168c&dev_002e&subsys_661311ad
pci\ven_168c&dev_002e&subsys_7189144f
pci\ven_168c&dev_002e&subsys_e030105b
pci\ven_168c&dev_002e&subsys_e034105b
pci\ven_168c&dev_0030
pci\ven_168c&dev_0030&subsys_009a106b
pci\ven_168c&dev_0030&subsys_05081a32
pci\ven_168c&dev_0030&subsys_11731a3b
pci\ven_168c&dev_0030&subsys_1627103c
pci\ven_168c&dev_0030&subsys_1628103c
pci\ven_168c&dev_0030&subsys_16a810cf
pci\ven_168c&dev_0030&subsys_18001b9a
pci\ven_168c&dev_0030&subsys_18011b9a
pci\ven_168c&dev_0030&subsys_18021b9a
pci\ven_168c&dev_0030&subsys_20001a56
pci\ven_168c&dev_0030&subsys_20011a56
pci\ven_168c&dev_0030&subsys_3112168c
pci\ven_168c&dev_0030&subsys_3113168c
pci\ven_168c&dev_0030&subsys_3114168c
pci\ven_168c&dev_0030&subsys_3116168c
pci\ven_168c&dev_0030&subsys_3a7e1186
pci\ven_168c&dev_0030&subsys_3abe1948
pci\ven_168c&dev_0030&subsys_4107144d
pci\ven_168c&dev_0030&subsys_4108144d
pci\ven_168c&dev_0030&subsys_4109144d
pci\ven_168c&dev_0030&subsys_410a144d
pci\ven_168c&dev_0030&subsys_410b144d
pci\ven_168c&dev_0030&subsys_410c144d
pci\ven_168c&dev_0030&subsys_650311ad
pci\ven_168c&dev_0030&subsys_651311ad
pci\ven_168c&dev_0030&subsys_652311ad
pci\ven_168c&dev_0030&subsys_7188144f
pci\ven_168c&dev_0030&subsys_e04a105b
pci\ven_168c&dev_0032&subsys_11861a3b
pci\ven_168c&dev_0032&subsys_118c1a3b
pci\ven_168c&dev_0032&subsys_11951a3b
pci\ven_168c&dev_0032&subsys_12371a3b
pci\ven_168c&dev_0032&subsys_126a1a3b
pci\ven_168c&dev_0032&subsys_1785103c
pci\ven_168c&dev_0032&subsys_179f103c
pci\ven_168c&dev_0032&subsys_1838103c
pci\ven_168c&dev_0032&subsys_191a103c
pci\ven_168c&dev_0032&subsys_1c001b9a
pci\ven_168c&dev_0032&subsys_1c011b9a
pci\ven_168c&dev_0032&subsys_1f861a3b
pci\ven_168c&dev_0032&subsys_1f951a3b
pci\ven_168c&dev_0032&subsys_20001b9a
pci\ven_168c&dev_0032&subsys_20011b9a
pci\ven_168c&dev_0032&subsys_20861a3b
pci\ven_168c&dev_0032&subsys_20971a3b
pci\ven_168c&dev_0032&subsys_209c1a3b
pci\ven_168c&dev_0032&subsys_21001a3b
pci\ven_168c&dev_0032&subsys_21261a3b
pci\ven_168c&dev_0032&subsys_21521a3b
pci\ven_168c&dev_0032&subsys_21871a3b
pci\ven_168c&dev_0032&subsys_2a871a3b
pci\ven_168c&dev_0032&subsys_2b32103c
pci\ven_168c&dev_0032&subsys_2b33103c
pci\ven_168c&dev_0032&subsys_2b871a3b
pci\ven_168c&dev_0032&subsys_2c971a3b
pci\ven_168c&dev_0032&subsys_2f871a3b
pci\ven_168c&dev_0032&subsys_3118168c
pci\ven_168c&dev_0032&subsys_311817aa
pci\ven_168c&dev_0032&subsys_3119168c
pci\ven_168c&dev_0032&subsys_3119185f
pci\ven_168c&dev_0032&subsys_3122168c
pci\ven_168c&dev_0032&subsys_312f168c
pci\ven_168c&dev_0032&subsys_321817aa
pci\ven_168c&dev_0032&subsys_321917aa
pci\ven_168c&dev_0032&subsys_40011c56
pci\ven_168c&dev_0032&subsys_4105144d
pci\ven_168c&dev_0032&subsys_4106144d
pci\ven_168c&dev_0032&subsys_410d144d
pci\ven_168c&dev_0032&subsys_410e144d
pci\ven_168c&dev_0032&subsys_410f144d
pci\ven_168c&dev_0032&subsys_4115144d
pci\ven_168c&dev_0032&subsys_4116144d
pci\ven_168c&dev_0032&subsys_4117144d
pci\ven_168c&dev_0032&subsys_43181a32
pci\ven_168c&dev_0032&subsys_660711ad
pci\ven_168c&dev_0032&subsys_660811ad
pci\ven_168c&dev_0032&subsys_661711ad
pci\ven_168c&dev_0032&subsys_661811ad
pci\ven_168c&dev_0032&subsys_662711ad
pci\ven_168c&dev_0032&subsys_662811ad
pci\ven_168c&dev_0032&subsys_663711ad
pci\ven_168c&dev_0032&subsys_664711ad
pci\ven_168c&dev_0032&subsys_665711ad
pci\ven_168c&dev_0032&subsys_7192144f
pci\ven_168c&dev_0032&subsys_7193144f
pci\ven_168c&dev_0032&subsys_7197144f
pci\ven_168c&dev_0032&subsys_850d1043
pci\ven_168c&dev_0032&subsys_860111ad
pci\ven_168c&dev_0032&subsys_861111ad
pci\ven_168c&dev_0032&subsys_862111ad
pci\ven_168c&dev_0032&subsys_863111ad
pci\ven_168c&dev_0032&subsys_a118185f
pci\ven_168c&dev_0032&subsys_b8411113
pci\ven_168c&dev_0032&subsys_b8421113
pci\ven_168c&dev_0032&subsys_c680144d
pci\ven_168c&dev_0032&subsys_c706144d
pci\ven_168c&dev_0032&subsys_c708144d
pci\ven_168c&dev_0032&subsys_e044105b
pci\ven_168c&dev_0032&subsys_e047105b
pci\ven_168c&dev_0032&subsys_e04d105b
pci\ven_168c&dev_0032&subsys_e04e105b
pci\ven_168c&dev_0032&subsys_e04f105b
pci\ven_168c&dev_0032&subsys_e051105b
pci\ven_168c&dev_0032&subsys_e062105b
pci\ven_168c&dev_0032&subsys_e063105b
pci\ven_168c&dev_0032&subsys_e075105b
pci\ven_168c&dev_0032&subsys_e080105b
pci\ven_168c&dev_0032&subsys_f8421113
pci\ven_168c&dev_0033
pci\ven_168c&dev_0034&subsys_006314cd
pci\ven_168c&dev_0034&subsys_006414cd
pci\ven_168c&dev_0034&subsys_008114cd
pci\ven_168c&dev_0034&subsys_008814cd
pci\ven_168c&dev_0034&subsys_00911969
pci\ven_168c&dev_0034&subsys_080211ad
pci\ven_168c&dev_0034&subsys_081211ad
pci\ven_168c&dev_0034&subsys_082211ad
pci\ven_168c&dev_0034&subsys_086211ad
pci\ven_168c&dev_0034&subsys_097517ed
pci\ven_168c&dev_0034&subsys_178310cf
pci\ven_168c&dev_0034&subsys_180e10cf
pci\ven_168c&dev_0034&subsys_1864103c
pci\ven_168c&dev_0034&subsys_18cd10cf
pci\ven_168c&dev_0034&subsys_20031a56
pci\ven_168c&dev_0034&subsys_21101a3b
pci\ven_168c&dev_0034&subsys_21161a3b
pci\ven_168c&dev_0034&subsys_211c1a3b
pci\ven_168c&dev_0034&subsys_211e1a3b
pci\ven_168c&dev_0034&subsys_211f1a3b
pci\ven_168c&dev_0034&subsys_21851a3b
pci\ven_168c&dev_0034&subsys_22081a3b
pci\ven_168c&dev_0034&subsys_22341a3b
pci\ven_168c&dev_0034&subsys_2c001b9a
pci\ven_168c&dev_0034&subsys_2c031b9a
pci\ven_168c&dev_0034&subsys_2c041b9a
pci\ven_168c&dev_0034&subsys_2f851a3b
pci\ven_168c&dev_0034&subsys_311417aa
pci\ven_168c&dev_0034&subsys_3117104d
pci\ven_168c&dev_0034&subsys_3117168c
pci\ven_168c&dev_0034&subsys_321417aa
pci\ven_168c&dev_0034&subsys_4110144d
pci\ven_168c&dev_0034&subsys_4111144d
pci\ven_168c&dev_0034&subsys_4112144d
pci\ven_168c&dev_0034&subsys_4113144d
pci\ven_168c&dev_0034&subsys_411f144d
pci\ven_168c&dev_0034&subsys_4120144d
pci\ven_168c&dev_0034&subsys_661111ad
pci\ven_168c&dev_0034&subsys_662111ad
pci\ven_168c&dev_0034&subsys_663111ad
pci\ven_168c&dev_0034&subsys_664111ad
pci\ven_168c&dev_0034&subsys_665111ad
pci\ven_168c&dev_0034&subsys_666111ad
pci\ven_168c&dev_0034&subsys_667111ad
pci\ven_168c&dev_0034&subsys_7055144f
pci\ven_168c&dev_0034&subsys_802a11ad
pci\ven_168c&dev_0034&subsys_812a11ad
pci\ven_168c&dev_0034&subsys_850e1043
pci\ven_168c&dev_0034&subsys_c0e6144d
pci\ven_168c&dev_0034&subsys_c0e8144d
pci\ven_168c&dev_0034&subsys_c0f9144d
pci\ven_168c&dev_0034&subsys_e052105b
pci\ven_168c&dev_0034&subsys_e058105b
pci\ven_168c&dev_0034&subsys_e059105b
pci\ven_168c&dev_0034&subsys_e064105b
pci\ven_168c&dev_0034&subsys_e07d105b
pci\ven_168c&dev_0034&subsys_e085105b
pci\ven_168c&dev_0034&subsys_e086105b
pci\ven_168c&dev_0034&subsys_e087105b
pci\ven_168c&dev_0034&subsys_e08c105b
pci\ven_168c&dev_0036&subsys_061211ad
pci\ven_168c&dev_0036&subsys_062211ad
pci\ven_168c&dev_0036&subsys_063211ad
pci\ven_168c&dev_0036&subsys_064211ad
pci\ven_168c&dev_0036&subsys_065211ad
pci\ven_168c&dev_0036&subsys_066211ad
pci\ven_168c&dev_0036&subsys_067211ad
pci\ven_168c&dev_0036&subsys_068211ad
pci\ven_168c&dev_0036&subsys_069211ad
pci\ven_168c&dev_0036&subsys_06a211ad
pci\ven_168c&dev_0036&subsys_06b211ad
pci\ven_168c&dev_0036&subsys_080311ad
pci\ven_168c&dev_0036&subsys_081311ad
pci\ven_168c&dev_0036&subsys_082311ad
pci\ven_168c&dev_0036&subsys_083211ad
pci\ven_168c&dev_0036&subsys_084211ad
pci\ven_168c&dev_0036&subsys_182311ad
pci\ven_168c&dev_0036&subsys_183211ad
pci\ven_168c&dev_0036&subsys_184211ad
pci\ven_168c&dev_0036&subsys_18e3103c
pci\ven_168c&dev_0036&subsys_2005103c
pci\ven_168c&dev_0036&subsys_21301a3b
pci\ven_168c&dev_0036&subsys_213a1a3b
pci\ven_168c&dev_0036&subsys_213b1a3b
pci\ven_168c&dev_0036&subsys_213c1a3b
pci\ven_168c&dev_0036&subsys_21761a3b
pci\ven_168c&dev_0036&subsys_217f103c
pci\ven_168c&dev_0036&subsys_21821a3b
pci\ven_168c&dev_0036&subsys_218a1a3b
pci\ven_168c&dev_0036&subsys_218b1a3b
pci\ven_168c&dev_0036&subsys_218c1a3b
pci\ven_168c&dev_0036&subsys_218d1a3b
pci\ven_168c&dev_0036&subsys_28101b9a
pci\ven_168c&dev_0036&subsys_28111b9a
pci\ven_168c&dev_0036&subsys_28121b9a
pci\ven_168c&dev_0036&subsys_28131b9a
pci\ven_168c&dev_0036&subsys_28a11b9a
pci\ven_168c&dev_0036&subsys_28a21b9a
pci\ven_168c&dev_0036&subsys_28a31b9a
pci\ven_168c&dev_0036&subsys_28a41b9a
pci\ven_168c&dev_0036&subsys_2f821a3b
pci\ven_168c&dev_0036&subsys_2f8a1a3b
pci\ven_168c&dev_0036&subsys_3025168c
pci\ven_168c&dev_0036&subsys_3026168c
pci\ven_168c&dev_0036&subsys_302617aa
pci\ven_168c&dev_0036&subsys_3027168c
pci\ven_168c&dev_0036&subsys_3027185f
pci\ven_168c&dev_0036&subsys_3028168c
pci\ven_168c&dev_0036&subsys_3028185f
pci\ven_168c&dev_0036&subsys_302b168c
pci\ven_168c&dev_0036&subsys_302c168c
pci\ven_168c&dev_0036&subsys_402617aa
pci\ven_168c&dev_0036&subsys_411a144d
pci\ven_168c&dev_0036&subsys_411b144d
pci\ven_168c&dev_0036&subsys_411c144d
pci\ven_168c&dev_0036&subsys_411d144d
pci\ven_168c&dev_0036&subsys_411e144d
pci\ven_168c&dev_0036&subsys_4129144d
pci\ven_168c&dev_0036&subsys_412a144d
pci\ven_168c&dev_0036&subsys_667111ad
pci\ven_168c&dev_0036&subsys_7202144f
pci\ven_168c&dev_0036&subsys_85f21043
pci\ven_168c&dev_0036&subsys_a119185f
pci\ven_168c&dev_0036&subsys_a120185f
pci\ven_168c&dev_0036&subsys_e068105b
pci\ven_168c&dev_0036&subsys_e069105b
pci\ven_168c&dev_0036&subsys_e07f105b
pci\ven_168c&dev_0036&subsys_e081105b
pci\ven_168c&dev_0036&subsys_e08f105b
pci\ven_168c&dev_0036&subsys_e091105b
pci\ven_168c&dev_0036&subsys_e099105b
pci\ven_168c&dev_0037&subsys_11951a3b
pci\ven_168c&dev_0037&subsys_1f951a3b
pci\ven_168c&dev_0037&subsys_21001a3b
pci\ven_168c&dev_0037&subsys_3118168c
pci\ven_168c&dev_0037&subsys_661711ad
pci\ven_168c&dev_0037&subsys_661811ad
pci\ven_168c&dev_0037&subsys_663711ad
pci\ven_168c&dev_1014&subsys_057e1014
pci\ven_168c&dev_1014&subsys_05891014
pci\ven_168c&dev_1014&subsys_058a1014
pci\ven_168c&dev_abcd
pci\ven_168c&dev_abcd&subsys_00000000
pci\ven_168c&dev_fe30
pci\ven_168c&dev_ff19
Match against Device Manager → Details → Hardware Ids to confirm this driver fits your device.
File details
File name:
d6c5c09d-827b-4f5d-81d0-b4f4e7fc39a6_c8afedf75f4cc91d8b41d20e0052636f11ab33be.cab
File size:
901737 bytes (0.8 MB)
Signed / DriverVer:
05/03/2016,10.0.0.340
Provider (INF):
Qualcomm Atheros Communications Inc.
Catalog file:
athw10.cat
SHA-256:
d3fd274d9e51fd6f0a727180b4b145446e938a37794a7f9500ea8a8f0911ad47
To verify: open PowerShell and run Get-FileHash <filename.cab>
What's inside the package (3 files)
athw10.cat 92.9 KB
athw10.inf 423.1 KB
athw10.sys 3.1 MB
All versions of this driver
| Version | Release Date | Architecture | OS | |
|---|---|---|---|---|
| 10.0.3.456 | 9/20/2017 | AMD64 | Windows 10 | 10.0.3.456 |
| 10.0.0.355 | 8/1/2017 | X86 | Windows 10 | 10.0.0.355 |
| 10.0.0.355 | 8/1/2017 | AMD64 | Windows 10 | 10.0.0.355 |
| 10.0.0.352 | 6/19/2017 | X86 | Windows 10 | 10.0.0.352 |
| 10.0.0.352 | 4/16/2017 | AMD64 | Windows 10 | 10.0.0.352 |
| 10.0.0.347 | 9/4/2016 | X86 | Windows 10 | 10.0.0.347 |
| 10.0.0.344 | 7/19/2016 | X86 | Windows 10 | 10.0.0.344 |
| 10.0.0.344 | 7/19/2016 | AMD64 | Windows 10 | 10.0.0.344 |
| 10.0.0.342 | 5/30/2016 | X86 | Windows 10 | 10.0.0.342 |
| 10.0.0.342 | 5/30/2016 | X86 | Windows 10 | 10.0.0.342 |
| 10.0.0.340 | 5/3/2016 | X86 | Windows 10 | (this page) |
| 10.0.0.340 | 5/3/2016 | X86 | Windows 10 | 10.0.0.340 |
| 3.0.2.201 | 3/26/2016 | X86 | Windows 10 | 3.0.2.201 |
| 10.0.0.329 | 11/19/2015 | X86 | Windows 10 | 10.0.0.329 |
| 10.0.0.329 | 11/19/2015 | X86 | Windows 10 | 10.0.0.329 |
| 10.0.0.326 | 9/6/2015 | AMD64 | Windows 10 | 10.0.0.326 |
| 10.0.0.318 | 5/17/2015 | X86 | Windows 10 | 10.0.0.318 |
| 10.0.0.318 | 5/17/2015 | AMD64 | Windows 10 | 10.0.0.318 |
| 10.0.0.263 | 8/7/2013 | AMD64 | Windows 8 | 10.0.0.263 |
| 10.0.0.263 | 8/7/2013 | X86 | Windows 8 | 10.0.0.263 |
| 10.0.0.256 | 7/4/2013 | X86 | Windows 8 | 10.0.0.256 |
| 3.0.0.119 | 2/28/2012 | X86 | Windows 8 | 3.0.0.119 |
| 3.0.0.119 | 2/28/2012 | X86 | Windows 8 | 3.0.0.119 |
Related drivers
- AR9485 Wireless Network Adapter (v10.0.0.352)
- AR928X Wireless Network Adapter (PCI-Express) (v10.0.0.326)
- QCA9377 802.11ac Wireless Network Adapter (v12.0.0.1272)
- QCA9377 802.11ac Wireless Network Adapter (v12.0.0.1159)
- QCA9377 802.11ac Wireless Network Adapter (v12.0.0.1076)
- QCA9377 802.11ac Wireless Network Adapter (v12.0.0.1016)
- QCA9377 802.11ac Wireless Network Adapter (v12.0.0.995)
- QCA9377 802.11ac Wireless Network Adapter (v12.0.0.953)
- QCA9377 802.11ac Wireless Network Adapter (v12.0.0.948)
- QCA9377 802.11ac Wireless Network Adapter (v12.0.0.945)
Sürücüler: Kararlı Cihaz Performansının Temeli
Sürücüler Neden Bu Kadar Önemlidir?
Sürücüler, sistem istikrarını korumada kritik bir rol oynar. Güncellenmemiş veya bozuk sürücüler şu sorunlara yol açabilir:
Sürücülerinizi her 3–6 ayda bir güncellemeniz önerilir. Bu, özellikle yeni bir işletim sistemi yüklemeden önce önemlidir çünkü güncellenmiş sürücüler uyumluluk için gerekli olabilir.
Sürücülerinizi Nasıl Güncel Tutabilirsiniz?
Sürücüleri güncellemek ve indirmek için otomatik yöntem (Tavsiye edilir):
Doğru sürücüyü manuel olarak aramak istemiyorsanız, cihaz modelinizi otomatik olarak algılayıp uyumlu sürücü bulan araçlar mevcuttur. Bu, hata riskini azaltır ve zaman kazandırır.
Özel teklif
İndirmek

Limitations: trial version offers an unlimited number of scans, free driver backup and rollback. Registration for the full version starts from USD 29.95. See more information about Outbyte and uninstall instructions. Please review Outbyte EULA and Privacy Policy
Tüm bağlantılar antivirüs programı tarafından taranmıştır.
Manuel sürücü kurulumu
Not: Yanlış bir sürücü yüklemek sistem sorunlarına neden olabilir. Hangi sürücüyü seçeceğinizden emin değilseniz, otomatik yöntemi öneririz.
Cihaz Yöneticisi aracılığıyla sürücüyü indirin. Cihaz Yöneticisi'ni nasıl açacağınız:
Cihaz Yöneticisi kullanarak sürücüleri nasıl yükleyeceğinizi:
How to Update a Driver for Free Using Outbyte Driver Updater
Cihaz sürücülerinizi güncel tutmak, Windows'un kararlı performansını ve donanımın düzgün çalışmasını sağlamaya yardımcı olur. Aşağıda, Outbyte Driver Updater kullanarak tek bir sürücüyü ücretsiz olarak nasıl güncelleyeceğinizi açıklayan adım adım bir kılavuz bulunmaktadır. Bu kılavuz, lisans etkinleştirmeden ve herhangi bir kişisel bilgi veya ödeme detayı sağlamadan seçili bir sürücüyü güncelleme yöntemini açıklar.
Kayıt Olmadan Ücretsiz Bir Sürücü Güncelleyebilir misiniz?
Evet.
Outbyte Driver Updater şunları yapmanızı sağlar:
- bilgisayarınızı ücretsiz olarak eski sürücüler için tarayın;
- tespit edilen sürücülerin listesini görüntüleyin;
- seçili bir sürücüyü ücretsiz olarak güncelleyin;
- e-posta adresi, ad, kredi kartı numarası veya diğer kişisel verileri girmekten kaçının.
Ücretsiz güncelleme işlemi yalnızca yüklü programı ve standart tarama ve güncelleme adımlarını gerektirir.
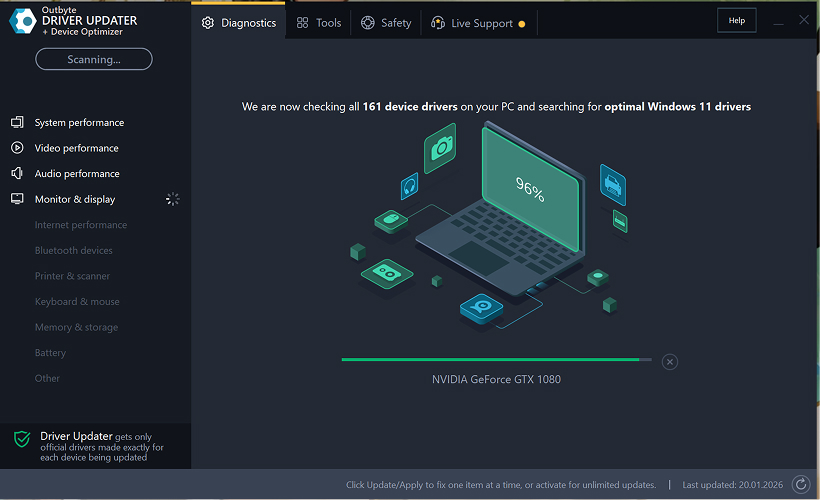
Adım 1: Programı Başlatın ve Bilgisayarınızı Tarayın
Outbyte Driver Updater'ı Windows PC'nize indirin ve kurun.
Programı başlattıktan sonra, otomatik olarak sisteminizi taramaya ve yüklü sürücüleri kontrol etmeye başlayacaktır.
Adım 2: Etkinleştirme Penceresini Kapatın
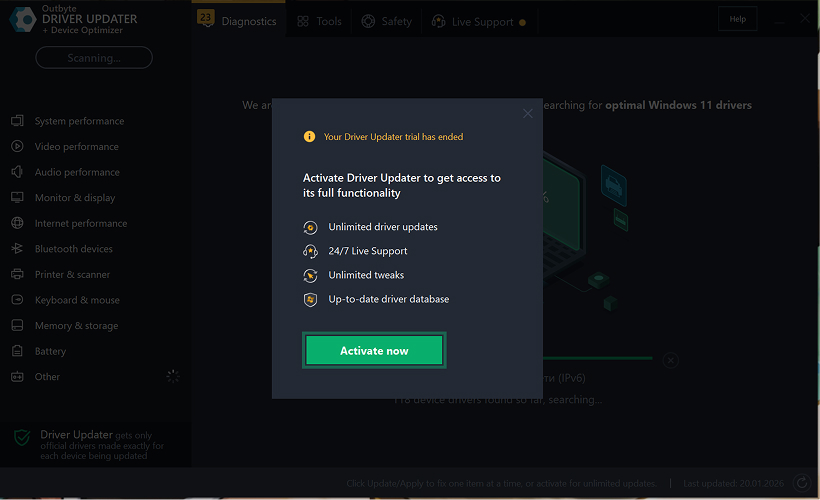
Taramadan sonra, "Şimdi etkinleştir" penceresi görünebilir.
Ücretsiz devam etmek için:
- pencerenin sağ üst köşesindeki kapat (X) düğmesine tıklayın.
Hiçbir bilgi girilmesi gerekmez
Adım 3: Sürücü Kategorisini Seçin
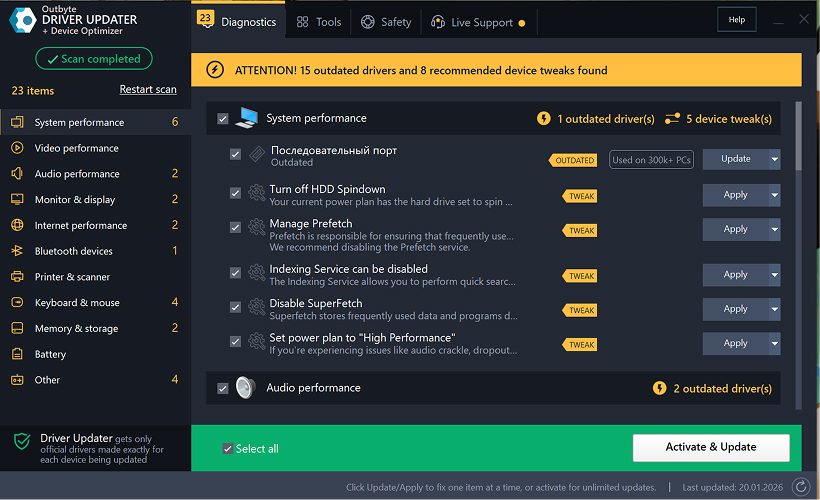
Sol taraftaki menüden, güncellemek istediğiniz cihaz kategorisini seçin, örneğin:
- ses sürücüleri;
- video ve grafik sürücüleri;
- ağ ve Wi-Fi sürücüleri;
- Bluetooth sürücüleri;
- yazıcı ve tarayıcı sürücüleri.
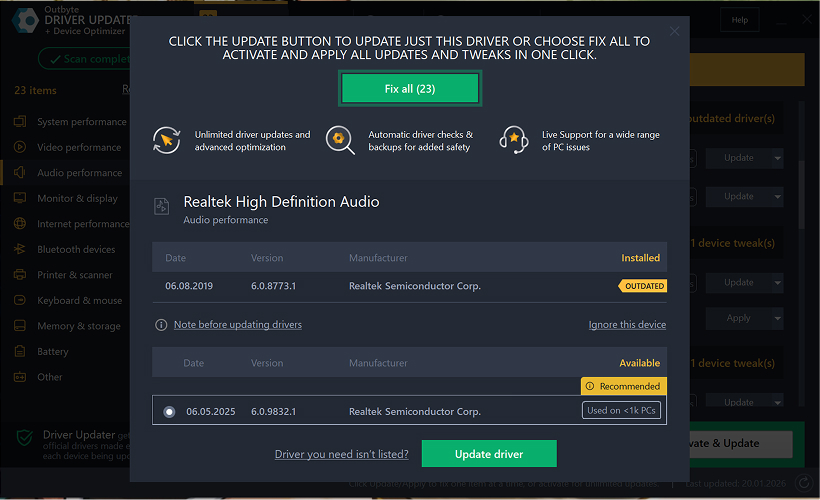
Adım 4: Seçili Sürücünün Yanındaki "Güncelle" Düğmesine Tıklayın
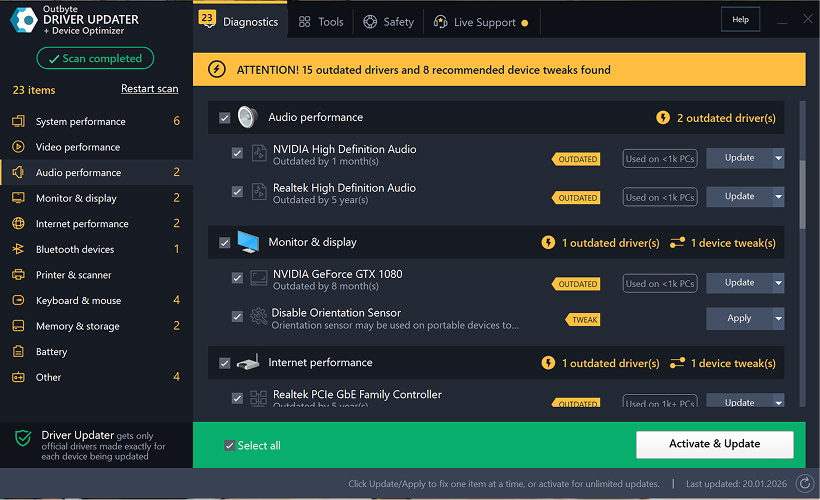
Sürücü listesinde, güncellemek istediğiniz sürücüyü bulun ve yanındaki Güncelle düğmesine tıklayın.
Adım 5: Sürücü Güncellemesini Onaylayın
Açılır pencerede, Sürücüyü güncelle seçeneğine tıklayın.
Bu aşamada, hiçbir kişisel veri veya ödeme detayı gerekmez.
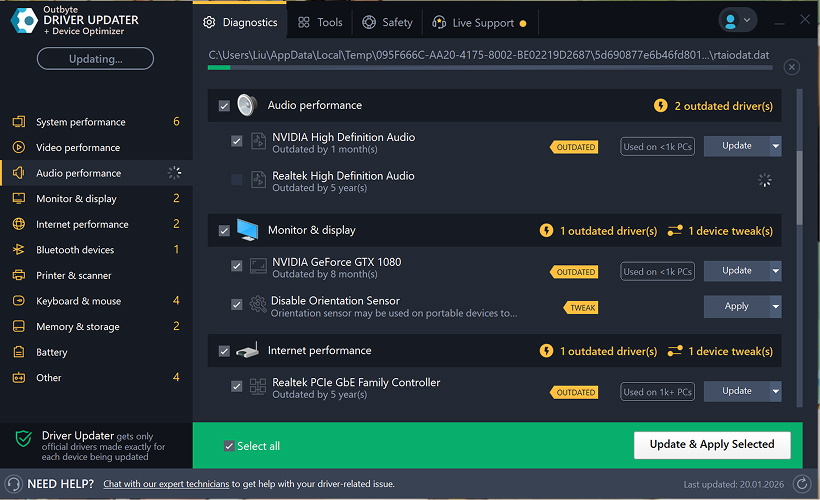
Adım 6: Güncelleme İşleminin Bitmesini Bekleyin
Program, seçili sürücüyü indirmeye ve yüklemeye başlayacaktır.
Lütfen işlem tamamlanana kadar bekleyin.
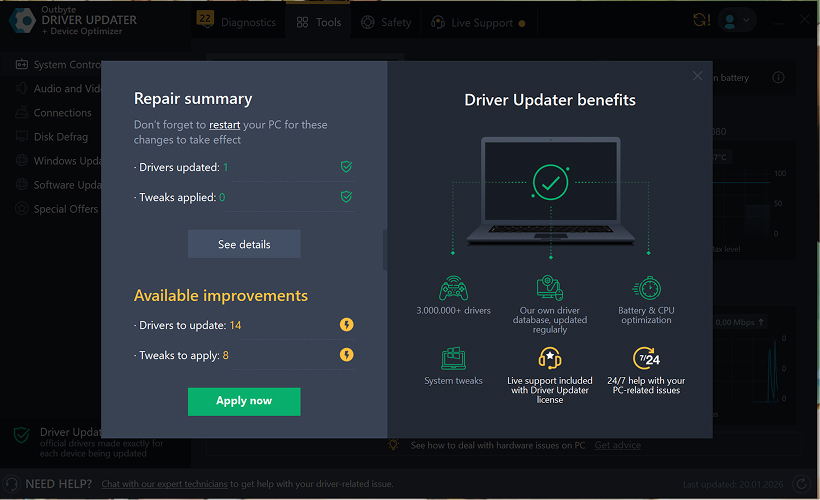
Adım 7: Değişiklikleri Uygulayın ve Bilgisayarınızı Yeniden Başlatın
Kurulum tamamlandıktan sonra, değişiklikleri uygulamak için Şimdi uygula seçeneğine tıklayın.
Güncellenen sürücünün doğru çalıştığından emin olmak için bilgisayarınızı yeniden başlatın.
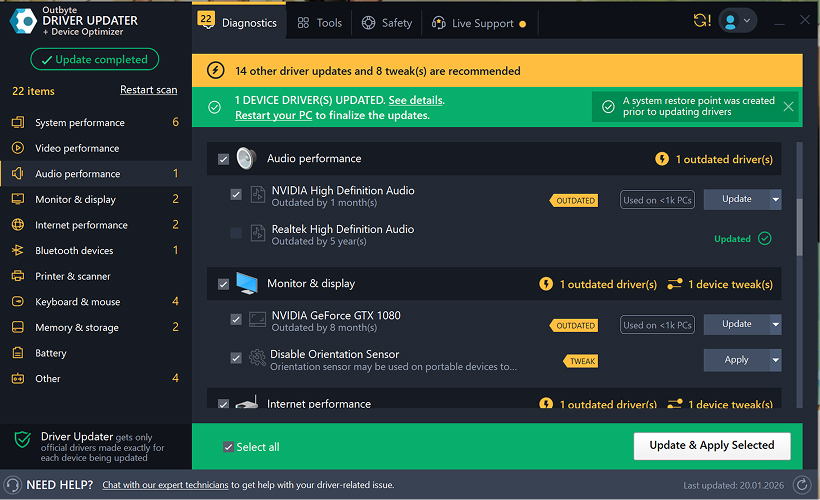
Önemli Notlar
- Ücretsiz güncellemeler her seferinde bir sürücü için kullanılabilir.
- Ücretsiz güncelleme için kayıt gerekmez.
- Kredi kartı veya ödeme bilgisi istenmez.
- Tüm işlemler, sisteminizi taradıktan sonra program içinde yerel olarak gerçekleştirilir.
- Ücretsiz güncelleme kullanılabilirliği, sürücü tipine ve sistem yapılandırmasına bağlı olabilir.
Learn to pair your wireless mouse with a different USB receiver in simple steps. Check compatibility (e.g., Logitech Unifying receivers), install required software/drivers, and use pairing modes to sync devices. Troubleshoot connection issues and optimize performance for seamless use.
Simplify your workspace with Logitech Unifying Software, enabling effortless connection of up to six compatible devices through a single receiver. Enjoy quick setup, clutter-free connectivity, and enhanced productivity as your keyboard, mouse, and other peripherals work in perfect harmony.
Learn how to set up your Epson L3250 printer with this step-by-step guide. Unbox, install ink, connect to power, and download drivers via Epson’s website or included CD. Configure Wi-Fi settings for wireless printing and run a test page to ensure proper installation. Simplify your setup process and start printing effortlessly.
Transform your smartphone into an HD webcam with DroidCam. Enjoy wireless connectivity and seamless video streaming for crystal-clear video calls, live streams, or online meetings. Works with PC/Mac.
Learn how to enable Bluetooth on your PC in a few simple steps. Check compatibility, activate Bluetooth via Windows Settings or the system tray, pair your device, and troubleshoot common issues. This guide ensures seamless wireless connections for headphones, speakers, or peripherals.
Learn how to set up your Epson L3250 printer quickly and efficiently. This guide covers unboxing, installing ink cartridges, connecting to power, and configuring Wi-Fi for seamless wireless printing. Follow step-by-step instructions to install drivers, align the printer head, and troubleshoot common issues. Perfect for home or office use, the Epson L3250 ensures hassle-free installation and high-quality printing, scanning, and copying.
Download the latest Epson L3250 printer drivers and software to ensure seamless connectivity and optimal performance. Compatible with Windows and macOS, these tools enable easy setup, wireless printing, and advanced features. Visit the official Epson support page for secure, up-to-date downloads tailored to your operating system. Simplify installation and maximize your printer’s capabilities with reliable drivers and utilities.
Discover innovative strategies to amplify your message and connect deeply with audiences – no microphone needed. Harness the power of body language, visual storytelling, and creative platforms to make your voice heard in any setting.
The Valeton GP 100 Wah is a professional-grade guitar pedal designed for musicians seeking dynamic sound control and expressive tonal shaping. Featuring a responsive wah circuit, it delivers smooth, vintage-inspired sweeps and modern versatility for rock, funk, blues, and beyond. Built with durable components and an intuitive design, the GP 100 ensures reliable performance on stage or in the studio. Adjustable parameters and a true bypass switch provide seamless integration into any pedalboard setup, while its compact size maximizes space efficiency. Elevate your playing with rich, articulate wah effects tailored to your musical style.
Virtual CloneDrive offers effortless disc image mounting and virtual drive cloning, enabling you to access ISO, BIN, IMG, and other formats without physical media. Streamline workflows, run software, or backup data with a lightweight, user-friendly tool that integrates seamlessly into your system. Simplify disc management and enhance productivity—no hardware required.